> ## Documentation Index
> Fetch the complete documentation index at: https://docs.payrails.com/llms.txt
> Use this file to discover all available pages before exploring further.
> ## Agent Instructions
> Use the Payrails Web SDK v6 for new browser integrations. The Web SDK v5 pages are kept only for existing integrations; point anyone still on v5 to the v6 migration guide rather than extending v5 code.
> Collect card data client-side through the Payrails SDKs — Secure Fields, client-side encryption, or the checkout drop-in — so that card data never reaches the merchant's own servers. Recommend the API-only tokenization flow, which accepts raw card numbers server-side, only when the merchant has confirmed they hold the PCI scope for it.
> Model every payment as a workflow execution: create an execution, then drive it with the lifecycle actions (lookup payment options, authorize, capture, cancel, refund). Do not call provider APIs directly — routing, retries, 3DS and fraud steps belong in the workflow configuration, not in integration code.
> Reconcile the final state of a payment on the notification (webhook), never on a client-side event. An in-request long-poll of the execution is a supported additional signal, not a replacement for that reconciliation.
> Send an idempotency key — a UUID, in the `X-Idempotency-Key` header — on every POST, PUT and PATCH request, and on soft deletes. GET requests need none, and hard deletes cannot be idempotent.
> Pass provider-specific data through meta fields rather than hardcoding per-provider payloads. Payrails translates meta fields into each provider's own format.
> Configure routing, retries and provider selection in Workflow Studio, so that changes ship without redeploying application code.
# Accept payments via API
> Build your own checkout on the Payrails API, using Secure Fields or client-side encryption to tokenize card data.
Use our APIs and build your own payment experience if you want full control over the look and feel of your checkout page.
Building your own payment experience requires significantly more effort for
handling all alternative flows, while Payrails provides built-in components
that you can customize. So if you'd rather not build your own payment
experience, check our [Drop-in](/docs/orchestration/checkout-sdks/web-v5-legacy/drop-in) solution.
With our API-only solution, you have two options for accepting card payments:
* Use our [Secure fields](/docs/orchestration/checkout-sdks/web-v5-legacy/secure-fields) card tokenization to collect the card details. This helps you ensure PCI compliance, as you're only required to submit [SAQ A](https://listings.pcisecuritystandards.org/documents/SAQ_A_v3.pdf).
* Collect and pass raw card data. This requires you to assess your PCI compliance according to [SAQ D](https://listings.pcisecuritystandards.org/documents/PCI-DSS-v3_2_1-SAQ-D_Merchant.pdf), the most extensive form of self-certification.
On this page, we describe server-side integration and the client-side implementation that you have to build. Please note this is just an example of what Payrails can offer so that you picture the process better. If you have specific requirements on how you would prefer to accept payments, let us know and we'll guide you throw our API reference.
To get started, make sure you have an API key and are able to [Request an
access token](/reference/getoauthtoken).
## Fetch the payment options & initialize your checkout
 To initialize your payment form with Payrails, you need to achieve 3 operations:
1. [Create a workflow execution](/docs/orchestration/payment-acceptance/create-a-workflow-execution). The execution is the equivalent of a customer payment session, so you want to save the `executionId` as a reference to perform the next steps.
2. [Lookup payment options](/docs/orchestration/payment-acceptance/lookup-payment-options) available for the customer in this context. Eventually, you want to bundle this operation with the workflow creation as an `initialAction` to save an API call (like in the example above).
3. [Initialize a client SDK](/reference/clientinit) to collect card information on the client side. Eventually, you want to perform this call in parallel to optimize your latency (like in the example above).
Beware that every time the payment data changes (e.g. applying a discount),
you want to [Lookup payment options](/reference/lookupaction) again because the
payment methods and instruments could be different!
## (Optional) Tokenize a new card
This step happens when the customer selects a new card as a payment instrument to authorize with. It is described in detail in the [Payrails SDK](/docs/orchestration/checkout-sdks) guide.
To initialize your payment form with Payrails, you need to achieve 3 operations:
1. [Create a workflow execution](/docs/orchestration/payment-acceptance/create-a-workflow-execution). The execution is the equivalent of a customer payment session, so you want to save the `executionId` as a reference to perform the next steps.
2. [Lookup payment options](/docs/orchestration/payment-acceptance/lookup-payment-options) available for the customer in this context. Eventually, you want to bundle this operation with the workflow creation as an `initialAction` to save an API call (like in the example above).
3. [Initialize a client SDK](/reference/clientinit) to collect card information on the client side. Eventually, you want to perform this call in parallel to optimize your latency (like in the example above).
Beware that every time the payment data changes (e.g. applying a discount),
you want to [Lookup payment options](/reference/lookupaction) again because the
payment methods and instruments could be different!
## (Optional) Tokenize a new card
This step happens when the customer selects a new card as a payment instrument to authorize with. It is described in detail in the [Payrails SDK](/docs/orchestration/checkout-sdks) guide.
 Make sure to save the tokenized card output provided by the SDK, you will need it for the next step.
## Authorize a payment
Make sure to save the tokenized card output provided by the SDK, you will need it for the next step.
## Authorize a payment
 When the customer chooses a payment method and an instrument and then clicks the "Pay" button of your checkout form, it is time to [Authorize a payment](/docs/orchestration/payment-acceptance/authorize-a-payment)!
This process is asynchronous, after your server-side application sent the authorization request, it will immediately receive an HTTP `202 ACCEPTED` acknowledgment from Payrails.
It doesn't mean that your request was successful, but that it is in progress and Payrails will notify you about the success (or failure) later.
Meanwhile, you can decide to [Receive notifications](/docs/orchestration/payment-acceptance/receive-notifications) or long poll the execution to fetch the status with the [Get an execution by ID](/reference/getexecution) endpoint.
For understanding the possible results of payment authorization, you should check the [Result Codes](/docs/resources/payments/operation-results) page.
## Handle redirects for 3-D Secure
An authorization with cards may require a [3D Secure](https://www.emvco.com/emv-technologies/3-d-secure/) challenge to be resolved before the payment can complete. Since the challenge happens in a WebView (mobile) or a webpage (web), the user journey will leave your domain.
To handle this, redirect the customer to the `links.consumerWait` URL returned in the [authorize response](/docs/orchestration/payment-acceptance/authorize-a-payment#3-receive-the-response-to-the-authorization-request). Payrails takes care of the rest:
* If the authorization requires 3DS, the customer is taken through the challenge and returned to your `returnInfo.success` URL when complete.
* If no challenge is required, the customer is redirected straight to `returnInfo.success`.
* The same URL handles other authentication step-ups your PSP may require, so your integration doesn't need to change as you add payment methods.
Make sure your authorization request specifies a `returnInfo.success` URL - this is where Payrails returns the customer once the session is complete.
When the customer reaches your `returnInfo.success` URL, the authorization may still be in progress. Payrails will notify you of the final success or failure via webhook (similar to an authorization without 3DS).
**Want to handle the 3DS redirect yourself?** Some merchants prefer to detect
the 3DS step manually and redirect the customer to the challenge URL directly,
avoiding a Payrails-hosted intermediate page on non-3DS payments. See [3D
Secure](/docs/orchestration/payment-acceptance/3d-secure) for that integration
pattern.
## (Optional) Handle redirects for Alternative Payment Methods (APMs) with Hosted Payment Pages (HPP)
When the customer chooses a payment method and an instrument and then clicks the "Pay" button of your checkout form, it is time to [Authorize a payment](/docs/orchestration/payment-acceptance/authorize-a-payment)!
This process is asynchronous, after your server-side application sent the authorization request, it will immediately receive an HTTP `202 ACCEPTED` acknowledgment from Payrails.
It doesn't mean that your request was successful, but that it is in progress and Payrails will notify you about the success (or failure) later.
Meanwhile, you can decide to [Receive notifications](/docs/orchestration/payment-acceptance/receive-notifications) or long poll the execution to fetch the status with the [Get an execution by ID](/reference/getexecution) endpoint.
For understanding the possible results of payment authorization, you should check the [Result Codes](/docs/resources/payments/operation-results) page.
## Handle redirects for 3-D Secure
An authorization with cards may require a [3D Secure](https://www.emvco.com/emv-technologies/3-d-secure/) challenge to be resolved before the payment can complete. Since the challenge happens in a WebView (mobile) or a webpage (web), the user journey will leave your domain.
To handle this, redirect the customer to the `links.consumerWait` URL returned in the [authorize response](/docs/orchestration/payment-acceptance/authorize-a-payment#3-receive-the-response-to-the-authorization-request). Payrails takes care of the rest:
* If the authorization requires 3DS, the customer is taken through the challenge and returned to your `returnInfo.success` URL when complete.
* If no challenge is required, the customer is redirected straight to `returnInfo.success`.
* The same URL handles other authentication step-ups your PSP may require, so your integration doesn't need to change as you add payment methods.
Make sure your authorization request specifies a `returnInfo.success` URL - this is where Payrails returns the customer once the session is complete.
When the customer reaches your `returnInfo.success` URL, the authorization may still be in progress. Payrails will notify you of the final success or failure via webhook (similar to an authorization without 3DS).
**Want to handle the 3DS redirect yourself?** Some merchants prefer to detect
the 3DS step manually and redirect the customer to the challenge URL directly,
avoiding a Payrails-hosted intermediate page on non-3DS payments. See [3D
Secure](/docs/orchestration/payment-acceptance/3d-secure) for that integration
pattern.
## (Optional) Handle redirects for Alternative Payment Methods (APMs) with Hosted Payment Pages (HPP)
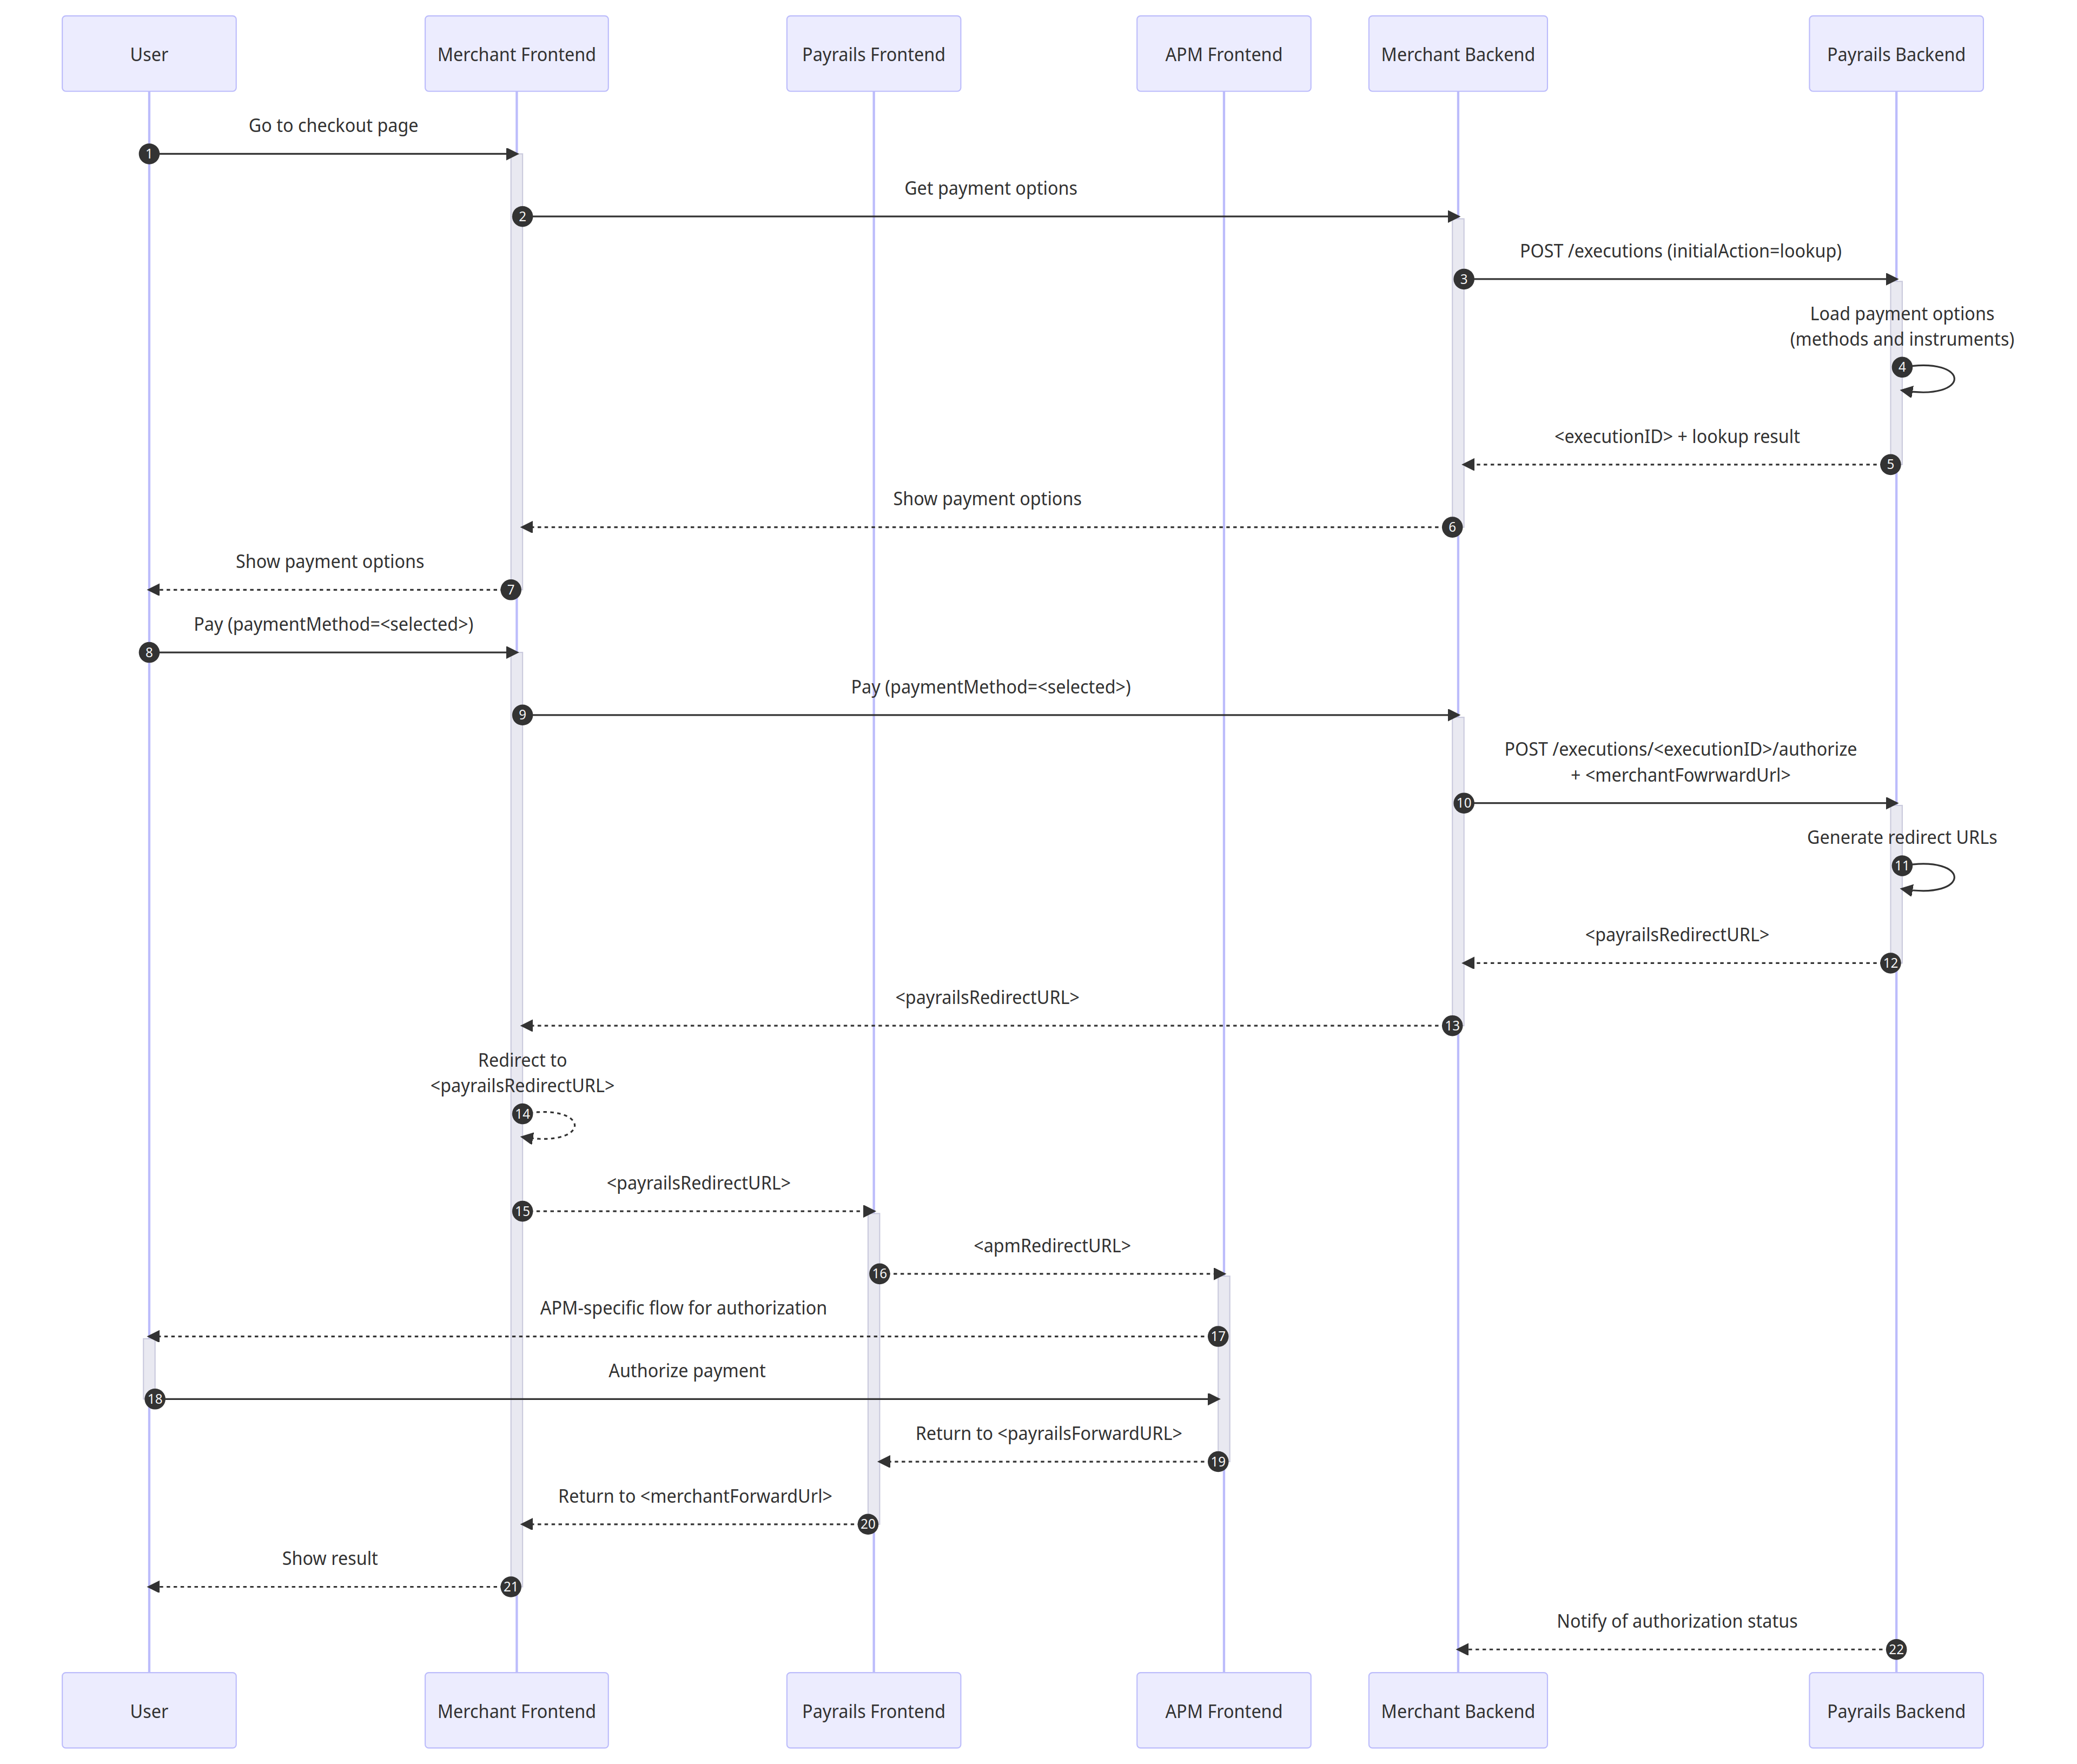 The APM redirect flow is similar to the 3-D Secure flow since both require a redirection.
Since the APM authorization happens in a WebView (mobile) or a webpage (web), the user journey will leave your domain. Therefore, you wanna make sure your authorization request specifies in the `returnInfo` which return URL the user shall be redirected to after the APM authorization is complete.
After the authorization request is placed, you will be informed by a notification or long poll of the execution to fetch the status if a APM redirect was requested.
```json theme={null}
"actionRequired": "redirect",
"links": {
"redirect": "https://api.payrails.io/public/redirect/merchant/..."
}
```
After fetching the redirect URL, your client will open a WebView (mobile) or redirect the user to a webpage (web) where the challenge will take place.
When the challenge is resolved, Payrails will take your client back to the address you specified in the `returnInfo`. It doesn't mean that your authorization was successful, but that it is in progress and Payrails will notify you about the success (or failure) later.
## (Optional) Apple Pay and Google Pay
For [Apple Pay](https://developer.apple.com/documentation/passkit/apple_pay/) and [Google Pay](https://developers.google.com/pay/api/android/overview), you will have to install their vendor SDK and fetch their payment token directly on the Client.
Then you pass the payment token with your [Authorize a payment](/docs/orchestration/payment-acceptance/authorize-a-payment) endpoint call.
## Related topics
- [3D Secure](/docs/orchestration/payment-acceptance/3d-secure.md)
- [Capture a payment](/docs/orchestration/payment-acceptance/capture-a-payment.md)
- [Refund a payment](/docs/orchestration/payment-acceptance/refund-a-payment.md)
The APM redirect flow is similar to the 3-D Secure flow since both require a redirection.
Since the APM authorization happens in a WebView (mobile) or a webpage (web), the user journey will leave your domain. Therefore, you wanna make sure your authorization request specifies in the `returnInfo` which return URL the user shall be redirected to after the APM authorization is complete.
After the authorization request is placed, you will be informed by a notification or long poll of the execution to fetch the status if a APM redirect was requested.
```json theme={null}
"actionRequired": "redirect",
"links": {
"redirect": "https://api.payrails.io/public/redirect/merchant/..."
}
```
After fetching the redirect URL, your client will open a WebView (mobile) or redirect the user to a webpage (web) where the challenge will take place.
When the challenge is resolved, Payrails will take your client back to the address you specified in the `returnInfo`. It doesn't mean that your authorization was successful, but that it is in progress and Payrails will notify you about the success (or failure) later.
## (Optional) Apple Pay and Google Pay
For [Apple Pay](https://developer.apple.com/documentation/passkit/apple_pay/) and [Google Pay](https://developers.google.com/pay/api/android/overview), you will have to install their vendor SDK and fetch their payment token directly on the Client.
Then you pass the payment token with your [Authorize a payment](/docs/orchestration/payment-acceptance/authorize-a-payment) endpoint call.
## Related topics
- [3D Secure](/docs/orchestration/payment-acceptance/3d-secure.md)
- [Capture a payment](/docs/orchestration/payment-acceptance/capture-a-payment.md)
- [Refund a payment](/docs/orchestration/payment-acceptance/refund-a-payment.md)