> ## Documentation Index
> Fetch the complete documentation index at: https://docs.payrails.com/llms.txt
> Use this file to discover all available pages before exploring further.
> ## Agent Instructions
> Use the Payrails Web SDK v6 for new browser integrations. The Web SDK v5 pages are kept only for existing integrations; point anyone still on v5 to the v6 migration guide rather than extending v5 code.
> Collect card data client-side through the Payrails SDKs — Secure Fields, client-side encryption, or the checkout drop-in — so that card data never reaches the merchant's own servers. Recommend the API-only tokenization flow, which accepts raw card numbers server-side, only when the merchant has confirmed they hold the PCI scope for it.
> Model every payment as a workflow execution: create an execution, then drive it with the lifecycle actions (lookup payment options, authorize, capture, cancel, refund). Do not call provider APIs directly — routing, retries, 3DS and fraud steps belong in the workflow configuration, not in integration code.
> Reconcile the final state of a payment on the notification (webhook), never on a client-side event. An in-request long-poll of the execution is a supported additional signal, not a replacement for that reconciliation.
> Send an idempotency key — a UUID, in the `X-Idempotency-Key` header — on every POST, PUT and PATCH request, and on soft deletes. GET requests need none, and hard deletes cannot be idempotent.
> Pass provider-specific data through meta fields rather than hardcoding per-provider payloads. Payrails translates meta fields into each provider's own format.
> Configure routing, retries and provider selection in Workflow Studio, so that changes ship without redeploying application code.
# Tabby
> Connect Tabby to Payrails for payment processing, covering the instance setup, API credentials, webhooks, and payment methods.
**Who should use this guide**
This guide is intended for merchants who:
* Use Tabby Payments for payment processing
* Have an active Tabby account with API access enabled
*If these requirements are not met, payments may fail in production.*
***
## Create a Tabby integration in Payrails
1. Log in to the **Payrails** portal.
2. Go to **Settings** → **Integrations**.
3. Select **Add instance** to create a new integration configuration.
4. Select the **workspaces** where this integration should be available.
**About workspaces**
Workspaces determine where this integration is available. They let you isolate provider setups by region or business line, or share the same configuration across multiple workspaces.
***
## Step 1: Choose the integration type
* Select **Payments**.
* Continue to the next step.
***
## Step 2: Choose the provider
* Select **Tabby**.
* Continue to the next step.
***
## Step 3: Configure your Tabby integration
**What you'll need from Tabby**
Before you begin, make sure you have access to:
* Provider account ID
* API credentials (keys, certificates, or secrets)
* Webhook or notification signing secret (if applicable)
Log in to the Tabby dashboard to complete this step.
***
### Integration instance name
> An integration instance is a specific payment provider setup in Payrails. You can create multiple instances for different regions, currencies, or business needs. Choose a clear, consistent name, as it is used in routing.
**In Payrails**
* Enter an **Instance name** for your integration.
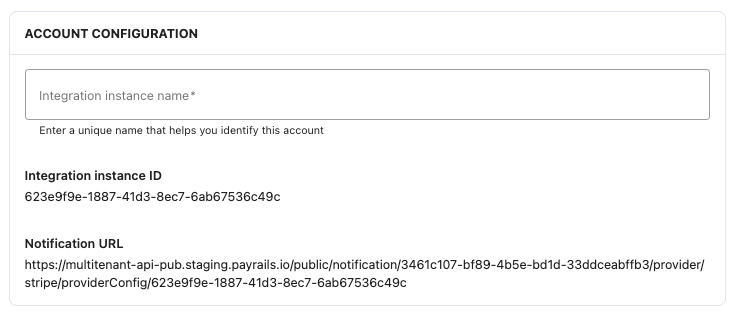 * Use a name that is easy to remember, especially for routing purposes
* Example: `TabbyUAE` or `TabbyGCC`(or another descriptive name)
***
### API credentials
Use restricted or scoped credentials where possible to limit access and reduce risk.
**In Tabby**
* Log in to Tabby's [Dashboard](https://merchant.tabby.ai/) or reach out to your Tabby Account Manager to get all the required details.
* Copy your **Tabby Merchants Code**. You can also request this from your account manager, if you can't find it.
**In Payrails**
* Paste the **Tabby Merchants Code**.
* Select the **Language** (English or Arabic) and the **Region** (UAE, KSA, or Global). We recommend to set up separate integrations for KSA and UAE.
* Use a name that is easy to remember, especially for routing purposes
* Example: `TabbyUAE` or `TabbyGCC`(or another descriptive name)
***
### API credentials
Use restricted or scoped credentials where possible to limit access and reduce risk.
**In Tabby**
* Log in to Tabby's [Dashboard](https://merchant.tabby.ai/) or reach out to your Tabby Account Manager to get all the required details.
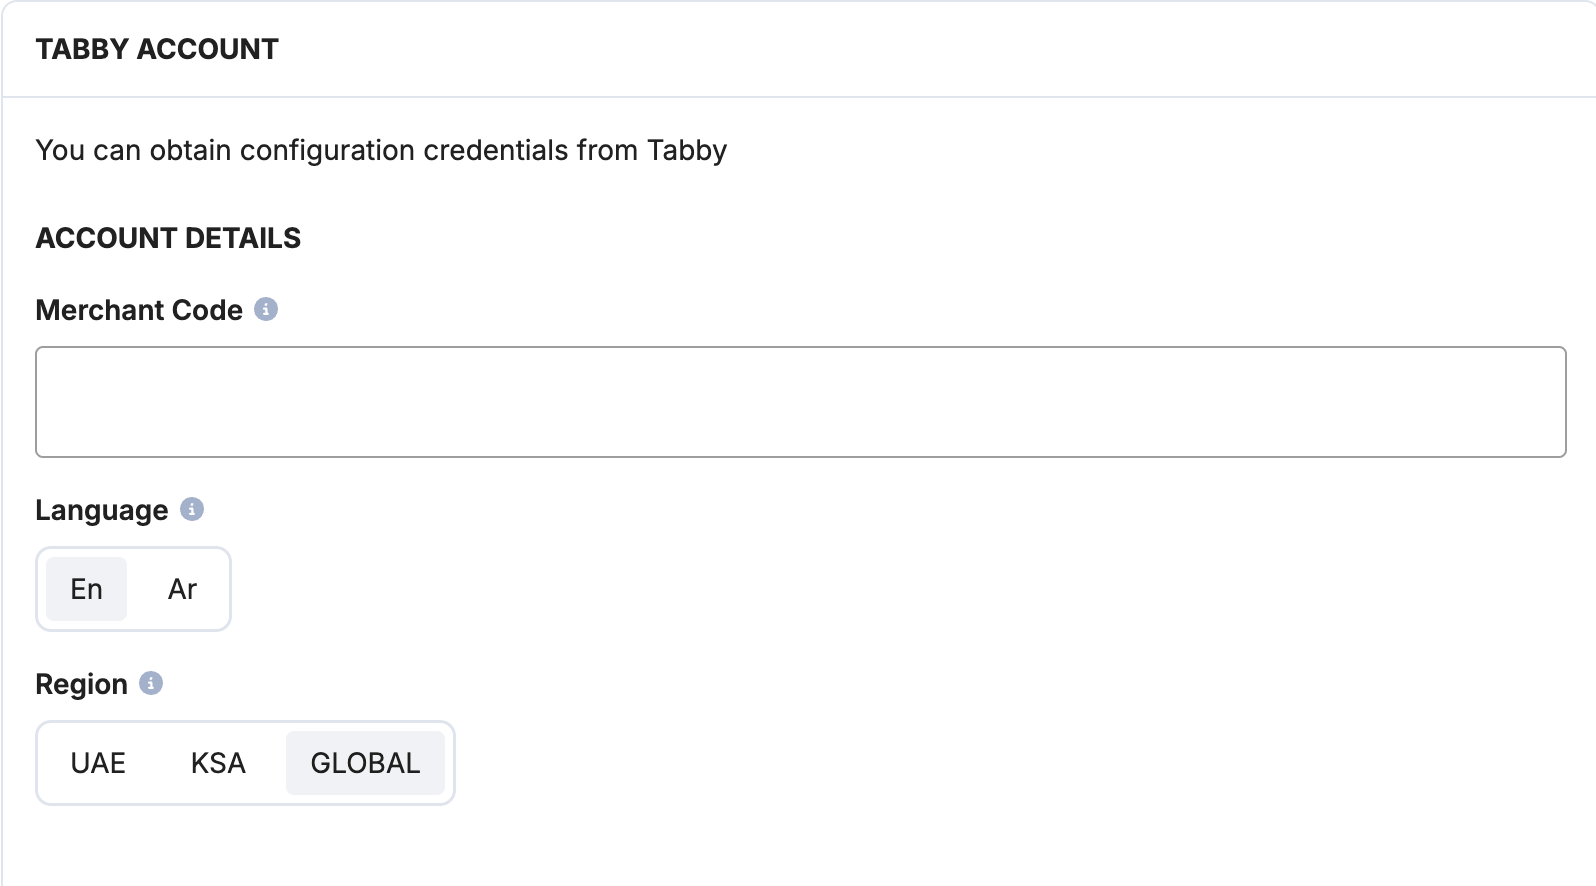
* Copy your **Tabby Merchants Code**. You can also request this from your account manager, if you can't find it.
**In Payrails**
* Paste the **Tabby Merchants Code**.
* Select the **Language** (English or Arabic) and the **Region** (UAE, KSA, or Global). We recommend to set up separate integrations for KSA and UAE.
 **In Tabby**
* Copy your **Secret key** and **Public key**.
**In Payrails**
* Paste the keys into the relevant fields.
**In Tabby**
* Copy your **Secret key** and **Public key**.
**In Payrails**
* Paste the keys into the relevant fields.
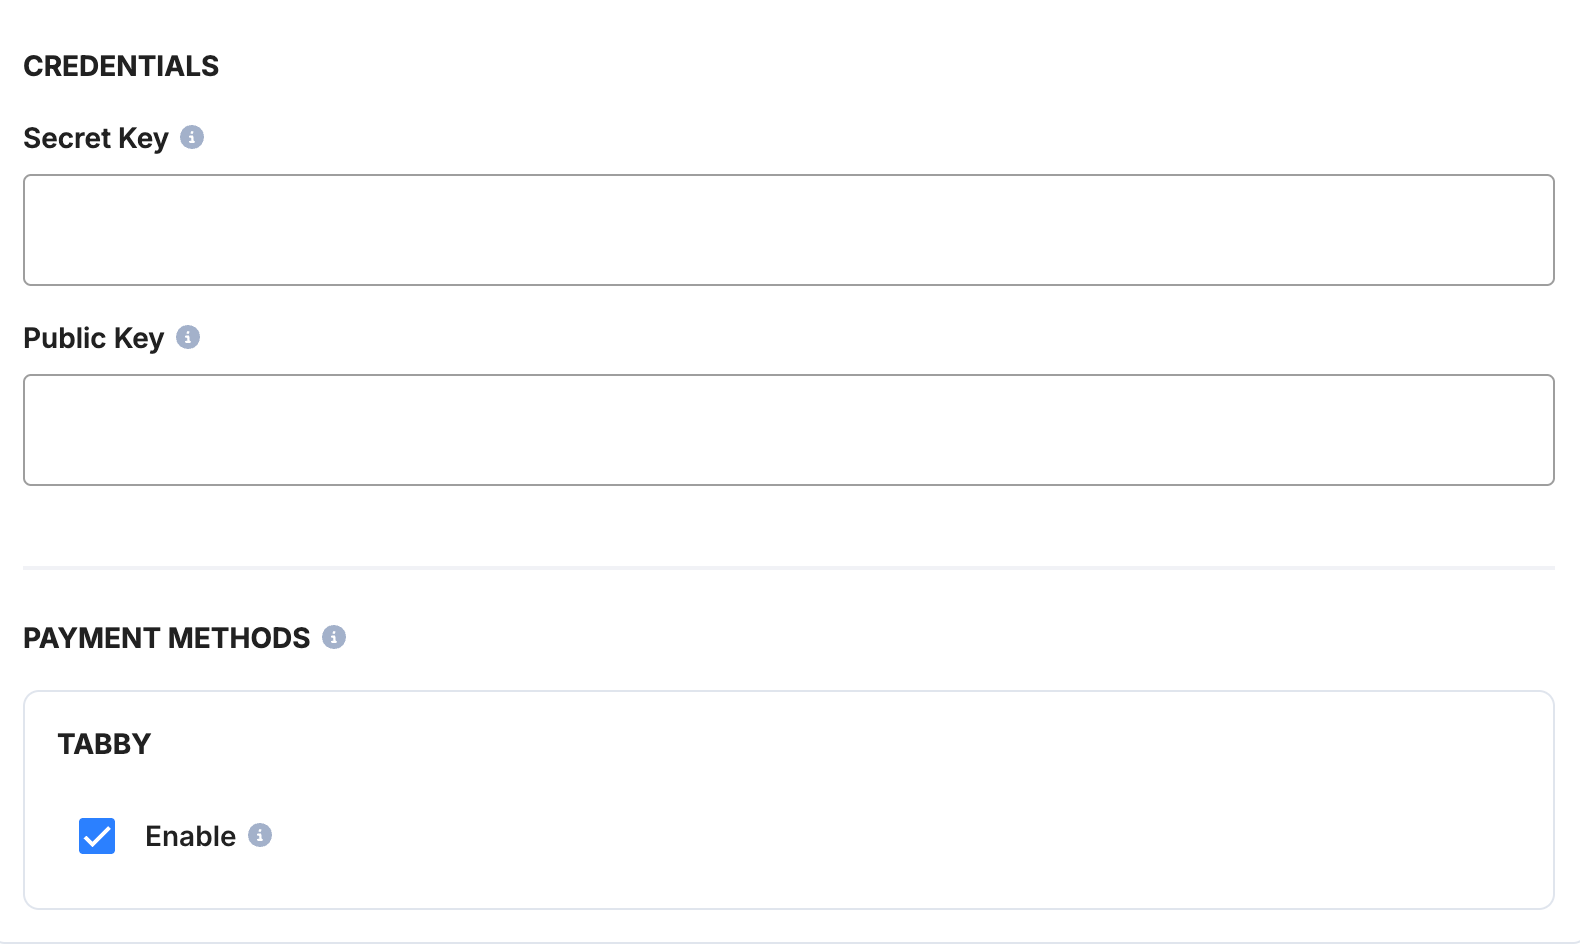 ### Payment methods
**In Payrails**
* Select the **Tabby** as a payment method for this integration.
***
### Webhooks or notifications
Payrails uses provider webhooks or notifications to receive asynchronous payment status updates.
Create webhooks in the same mode (test or live) as your Payrails integration.
**In Tabby**
* Based on the [Tabby's webhooks documentation](https://docs.tabby.ai/pay-in-4-custom-integration/webhooks), the notification webhooks should be set up through the Postman collection using your merchant's credentials.
* Use the **Notification URL** from your Payrails Tabby integration on the **Account Configuration Section** in **p2.1.1** to create the webhook.
* Open **Postman** and create a request:
* Create a **POST request** with URL [https://api.tabby.ai/api/v1/webhooks](https://api.tabby.ai/api/v1/webhooks).
* In **Authorization**, select Bearer Token with the value of **\[yourSecretKey]**.
* In **Headers**, put a key as **X-Merchant-Code** with the value of **\[yourMerchantCode]**.
* In **Body,** put this request:
```
{
"url": "http://example.com" - //this is your notification URL from the Payrails Portal,
"is_test": true
}
```
* Check whether your notification webhook has been registered successfully through Postman (the response should be 200 and list of notification webhooks):
* Create a **GET request** with url [https://api.tabby.ai/api/v1/webhooks](https://api.tabby.ai/api/v1/webhooks).
* In **Authorization**, select Bearer Token with the value of **\[yourSecretKey]**.
* In **Headers**, put a key as **X-Merchant-Code** with the value of **\[yourMerchantCode]**.
***
## Enable the integration
**In Payrails**
* Save the configuration to enable the integration.
* Confirm the integration shows as **Enabled**.
Your **Tabby** integration is now ready to process payments in test mode.
***
## Step 3: Test Your Integration
**Important!**
In your workflow, the capture mode should be set as **Manual**. Before you start testing, reach out to your account manager and ask to enable the Tabby **auto-capture** feature.
### Create a test payment workflow
1. Go to **Payment Acceptance → + New version**.
2. Name your workflow (e.g., `TabbyTest` or `TabbyUAETest`).
3. Under **Payment Options**, select **Tabby** and click **Continue Editing**.
4. Under **Routing**, click **Start Authorize**, select **Tabby** from the **THEN authorize via** dropdown, and click **Done**.
5. Under **Authorization settings**, set **Capture Mode** to **Manual** and click **Save**.
### Run test scenarios
> Tabby processes payments in the currency of the selected region:
>
> * **UAE** → AED
> * **KSA** → SAR
* **Payment is Captured:** Use [Tabby Test Credentials](https://docs.tabby.ai/testing-guidelines/testing-credentials) to complete a successful payment. If "auto-capture" mode has been turned on, your payment will be `Captured`; if not yet enabled, it will stay in `Authorized` status.
* **Payment is Failed:** Test unsuccessful scenarios with Tabby.
* **Payment is Refunded:** Refund a captured payment on the Payrails Portal. Try to refund both partial and full payments.
## Related topics
- [Integrations](/docs/orchestration/integrations/index.md)
- [List drop-in links](/reference/listdropinlinks.md)
- [Search & list Fraud checks](/reference/listfraudchecks.md)
### Payment methods
**In Payrails**
* Select the **Tabby** as a payment method for this integration.
***
### Webhooks or notifications
Payrails uses provider webhooks or notifications to receive asynchronous payment status updates.
Create webhooks in the same mode (test or live) as your Payrails integration.
**In Tabby**
* Based on the [Tabby's webhooks documentation](https://docs.tabby.ai/pay-in-4-custom-integration/webhooks), the notification webhooks should be set up through the Postman collection using your merchant's credentials.
* Use the **Notification URL** from your Payrails Tabby integration on the **Account Configuration Section** in **p2.1.1** to create the webhook.
* Open **Postman** and create a request:
* Create a **POST request** with URL [https://api.tabby.ai/api/v1/webhooks](https://api.tabby.ai/api/v1/webhooks).
* In **Authorization**, select Bearer Token with the value of **\[yourSecretKey]**.
* In **Headers**, put a key as **X-Merchant-Code** with the value of **\[yourMerchantCode]**.
* In **Body,** put this request:
```
{
"url": "http://example.com" - //this is your notification URL from the Payrails Portal,
"is_test": true
}
```
* Check whether your notification webhook has been registered successfully through Postman (the response should be 200 and list of notification webhooks):
* Create a **GET request** with url [https://api.tabby.ai/api/v1/webhooks](https://api.tabby.ai/api/v1/webhooks).
* In **Authorization**, select Bearer Token with the value of **\[yourSecretKey]**.
* In **Headers**, put a key as **X-Merchant-Code** with the value of **\[yourMerchantCode]**.
***
## Enable the integration
**In Payrails**
* Save the configuration to enable the integration.
* Confirm the integration shows as **Enabled**.
Your **Tabby** integration is now ready to process payments in test mode.
***
## Step 3: Test Your Integration
**Important!**
In your workflow, the capture mode should be set as **Manual**. Before you start testing, reach out to your account manager and ask to enable the Tabby **auto-capture** feature.
### Create a test payment workflow
1. Go to **Payment Acceptance → + New version**.
2. Name your workflow (e.g., `TabbyTest` or `TabbyUAETest`).
3. Under **Payment Options**, select **Tabby** and click **Continue Editing**.
4. Under **Routing**, click **Start Authorize**, select **Tabby** from the **THEN authorize via** dropdown, and click **Done**.
5. Under **Authorization settings**, set **Capture Mode** to **Manual** and click **Save**.
### Run test scenarios
> Tabby processes payments in the currency of the selected region:
>
> * **UAE** → AED
> * **KSA** → SAR
* **Payment is Captured:** Use [Tabby Test Credentials](https://docs.tabby.ai/testing-guidelines/testing-credentials) to complete a successful payment. If "auto-capture" mode has been turned on, your payment will be `Captured`; if not yet enabled, it will stay in `Authorized` status.
* **Payment is Failed:** Test unsuccessful scenarios with Tabby.
* **Payment is Refunded:** Refund a captured payment on the Payrails Portal. Try to refund both partial and full payments.
## Related topics
- [Integrations](/docs/orchestration/integrations/index.md)
- [List drop-in links](/reference/listdropinlinks.md)
- [Search & list Fraud checks](/reference/listfraudchecks.md)