Payrails Checkout SDKs
Payrails SDKs provide building blocks to create a checkout experience for your customers.
They exist for iOS, Android, web, and React Native. Regardless of the platform, they follow the same principles.
You can integrate with the SDK in three ways.
- Drop-in: an all-in-one payment form to accept payments on your website.
- Elements: modular payment UI components you can assemble to build a modular payment form.
- Secure fields: secure input fields for PCI-compliant cardholder data collection.
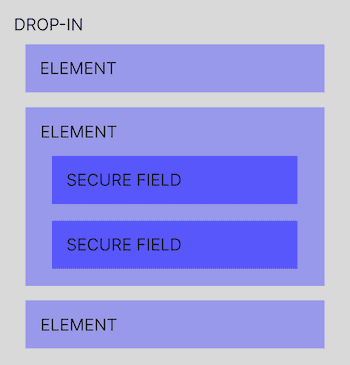
The Drop-in contains one-to-many Elements (depending on how many active payment methods you have). Some Elements dealing with cardholder data collection include Secure Fields. All three options are included in our SDK.
Getting started with the SDK
Regardless of which SDK components you want, it starts with the same initialization process.
The Payrails SDK requires a secure context (HTTPS). If testing locally, ensure your development server uses HTTPS.
Including the SDK
You can install the SDK with your favorite package manager (e.g.,npm):
npm install @payrails/web-sdk#Mentioning the below source will pick the podspec from Payrails repo
#Otherwise you can add cocoapod trunk as the source
#source 'https://github.com/payrailsapi/payrails-iOS-spec.git'
pod 'Payrails'npm install @payrails/react-native-sdkInitializing the SDK
Use the init() method to initialize a Payrails client as shown below, with configuration:
// With a Bundler (Webpack, Vite, Rollup, esbuild, etc.)
import { Payrails, PayrailsEnvironment } from '@payrails/web-sdk';
import '@payrails/web-sdk/payrails-styles.css';

// Without a Bundler (Native ESM in the Browser)
import { Payrails, PayrailsEnvironment } from '@payrails/web-sdk';

// CommonJS (Node.js / Legacy)
// For CommonJS environments, use require:
const { Payrails, PayrailsEnvironment } = require('@payrails/web-sdk');
import '@payrails/web-sdk/payrails-styles.css';


const config = await fetch("https://give.me.SDK.config.com");
const options = {
    environment: "TEST", // or "PRODUCTION"
    events: {
      onClientInitialized: (execution: WorkflowExecution) => {
          console.log("Payrails client initialized", execution);
      }
    },
    returnInfo: {
      success: 'payrails.com/success',
      cancel: 'payrails.com/failure',
      error: 'payrails.com/error',
      pending: 'payrails.com/pending',
    }
}

const payrailsClient = Payrails.init(config, options);
let config = Payrails.Configuration(
data: <DATA>,
options: Payrails.Options(
env?: Payrails.Env // optional, if not specified default is PROD
)
)
let payrails = try await Payrails.configure(
with: configuration
)import { PayrailsProvider } from "@payrails/react-native-sdk";
const App = () => {
const config = useFetch("https://give.me.sdk-config.com");
return (
<PayrailsProvider
config={config}
returnInfo={{
success: 'https://yourapp.com/payment/success',
error: 'https://yourapp.com/payment/error',
cancel: 'https://yourapp.com/payment/cancel',
}}
>
// Other elements goes here.
</PayrailsProvider>
);
};Your backend should call the Initialize a client SDK endpoint. You simply forward the response to SDK.
Once your SDK is initialized, it can interact directly with Payrails from your client.
Example authorization flow
Here's a simple authorization flow with the surface covered by the SDK:

To ensure your frontend can communicate securely with Payrails, you must first fetch configurations from your server-side application. See the detailed endpoint reference to Initialize a client SDK.
Example for web
<div id="dropin-container" />import '@payrails/web-sdk/payrails-styles.css';
import { Payrails } from "@payrails/web-sdk";
// 1. call your server-side app to get SDK configs from there
const config = await fetch("https://give.me.SDK.config.com");
// 2. Initialize Payrails client
const payrailsClient = Payrails.init(config, { environment: "TEST" });
// 3. Create a Dropin container: pass your styles, translations, configs and events)
const dropinConfig = {} // sample dropin config
const dropin = payrailsClient.dropin(dropinConfig);
// 4. Mount the Dropin to your DOM
dropin.mount("#dropin-container");Learn more
After the SDK is initialized, you can leverage the SDK features to customize the user experience:
- custom field validation and errors
- subscribe and react to events happening inside the form
- customize the style with JSS
- save your tokenized card and get a payment instrument for future references
Payment amount update
Our SDK supports the possibility of updating the amount. To achieve that, 2 things have to be done:
- Merchant backend must call the lookup action on the execution used for that payment session.
- Merchant client has to update the SDK with the new amount. Moreover, if installments are enabled, the merchant client must also update the installment configuration along with the amount.
Example:
import '@payrails/web-sdk/payrails-styles.css';
import { Payrails } from "@payrails/web-sdk";

// 1. call your server-side app to get SDK configs from there.
const config = await fetch("https://give.me.SDK.config.com");

let executionId;

// 2. Initialize Payrails client
const payrailsClient = Payrails.init(config, {
  events: {
    onClientInitialized: async (workflow) => {
      executionId = workflow.executionResponse.id
    }
  }
});

// 3. Initialize dropin
const dropinConfig = {} // sample dropin config
const dropin = payrailsClient.dropin(dropinConfig)

// 4. Update amount from the backend
await fetch(`https://do-lookup-with-new-amount-on-backend.com?executionId=${executionId}`)

// 5. Update the SDK Client
payrailsClient.update({
  value: "1"
  currency: "USD",
  installmentConfig: {
    defaultInstallment: 2,
    installmentCountry: 'US',
    installmentOptions: [],
  }
})
In case of a mismatch between the authorized amount, which is set on execution on the backend, and what's set on the SDK client, requests will be rejected with 401 HTTP error.
Refresh Client Session
Our SDK allows merchants to pass the function which contains their implementation of client init as part of the onSessionExpired event. This then can be used to automatically reinitialize the client when the client session is expired instead of merchants having to do this themselves.
Example:
import '@payrails/web-sdk/payrails-styles.css';
import { Payrails } from "@payrails/web-sdk";

// 1. call your server-side app to get SDK configs from there.
const config = await fetch("https://give.me.SDK.config.com");

let executionId;

// 2. Initialize Payrails client
const payrailsClient = Payrails.init(config, {
  events: {
    onClientInitialized: async (workflow) => {
      executionId = workflow.executionResponse.id
    },
    onSessionExpired: async () => {
      const result = await initPayrailsClient(config);
      return result?.res;
    }
  }
});

// 3. Initialize dropin
const dropinConfig = {} // sample dropin config
const dropin = payrailsClient.dropin(dropinConfig)
BIN lookup
Our SDK supports using our BIN lookup service to fetch card information. This feature is not enabled by default, so please reach out to your account manager to enable.
Example:
import '@payrails/web-sdk/payrails-styles.css';
import { Payrails } from "@payrails/web-sdk";

// 1. call your server-side app to get SDK configs from there.
const config = await fetch("https://give.me.SDK.config.com");

// 2. Initialize Payrails client
const payrailsClient = Payrails.init(config);

// 3. Initialize dropin
const dropinConfig = {} // sample dropin config
const dropin = payrailsClient.dropin(dropinConfig)

// 4. Perform BIN lookup
const result = await payrailsClient.binLookup()
In case complete BIN lookup is not enabled your environment, the API returns the first 8 digits of the PAN.
If the BIN Lookup is enabled then the complete API response is returned.
// Sample BIN Lookup Response
{
    "bin": "411111",
    "network": "visa",
    "issuer": "JPMORGAN CHASE BANK, N.A.",
    "issuerCountry": {
        "code": "US",
        "name": "UNITED STATES",
        "iso3": "USA"
    },
    "type": "CREDIT"
}
Example on how to allow only credit cards:
import '@payrails/web-sdk/payrails-styles.css';
import { Payrails } from "@payrails/web-sdk";

// 1. call your server-side app to get SDK configs from there.
const config = await fetch("https://give.me.SDK.config.com");

// 2. Initialize Payrails client
const payrailsClient = Payrails.init(config);

const dropin = payrailsClient.dropin({
  events: {
    async onPaymentButtonClicked() {
      const { type = '' } = await payrails.binLookup();

      return type === 'CREDIT';
     },
  }
});
Installment payments for cards in MX and BR
In certain countries or regions, it's common for shoppers to pay for purchases in installments using credit cards. This allows them to receive their items right away while spreading the cost over multiple months. The installment payments are automatically charged to the shopper’s credit card every 30 days until the full balance is settled.
Our SDK supports collecting installment plan information from the end-user and passing it through to downstream processors. Please contact us if you would like to enable this feature.
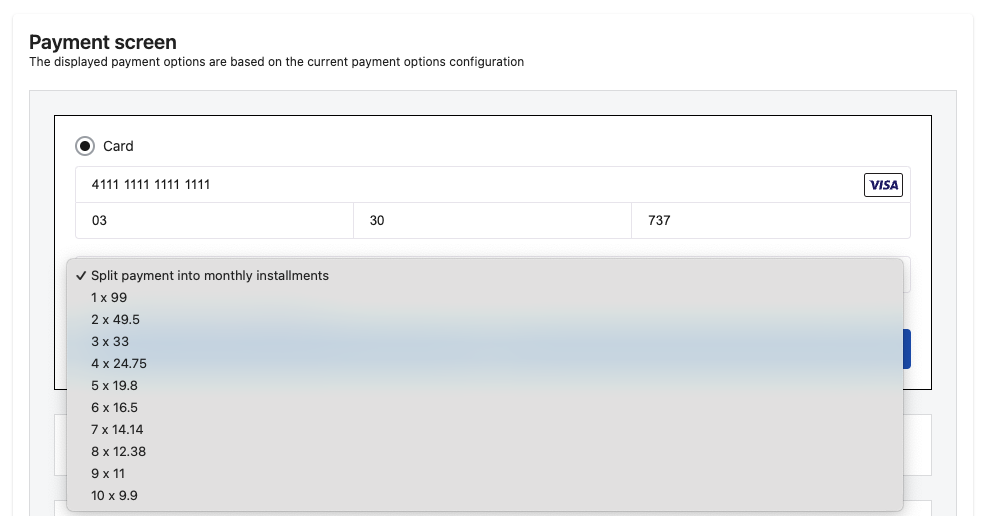
Config options for installments dropdown
payrails.cardForm({
installmentConfig: {
defaultInstallment: 2,
},
translations: {
labels: {
paymentInstallments: 'Payment Installments',
},
},
styles: {
storeCardCheckbox: {
color: 'red',
},
errorTextStyles: {
base: {
display: 'block',
},
},
paymentInstallmentsDropdown: {
backgroundColor: 'lightgray',
color: 'black',
fontSize: '14px',
},
},
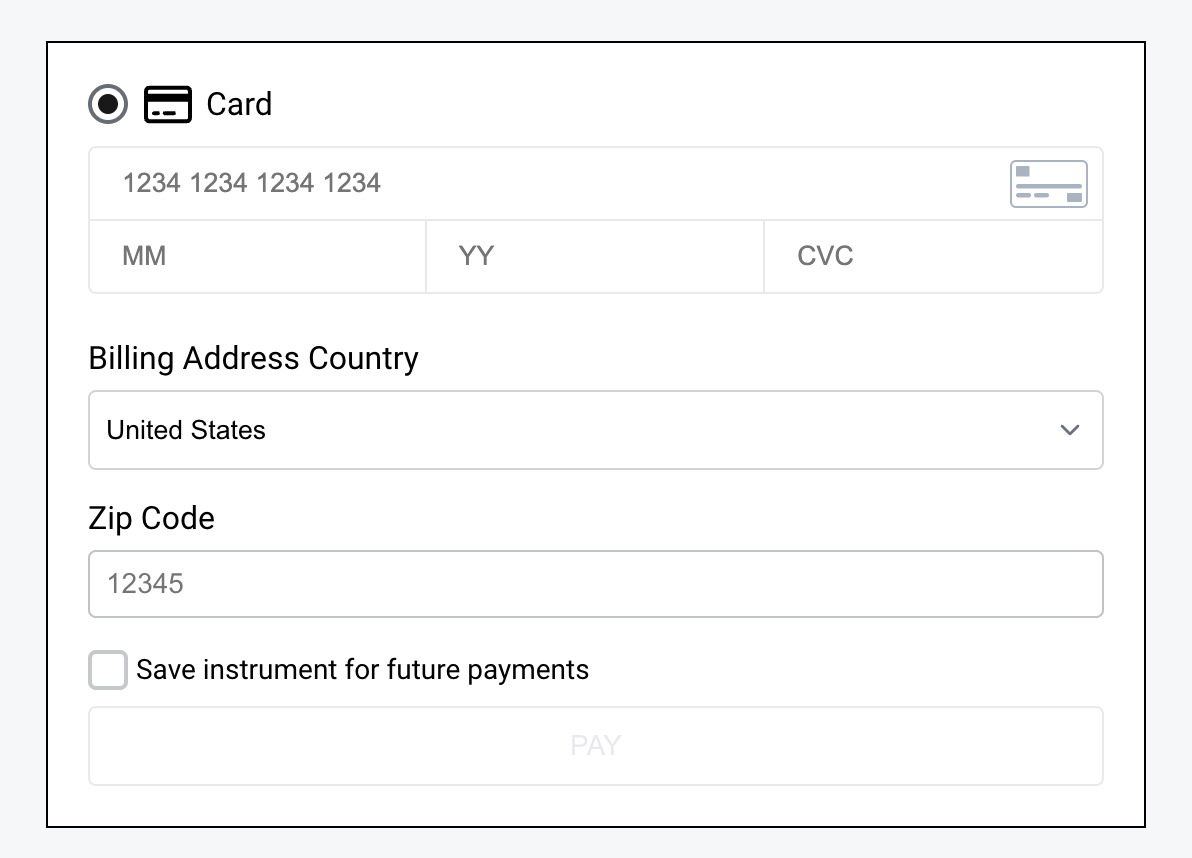
});Accept Customer Address
With dropin it is possible to show address component to the end user. You can use it for collecting billing address which may be needed to tax purposes. Please contact us if you would like to enable this feature.
Example code for billing address config
const dropinConfig = {
  "translations": {
    "addressSelector": {
      "labels": {
        "countrySelector": "Select Country",
        "postalCodeInput": "Zip Code"
      },
      "placeholders": {
        "postalCodeInput": "12345",
        "countrySelector": "Country"
      }
    }
  },
  "styles": {
    "addressSelector": {
      "wrapper": {
        "display": "flex",
        "flexDirection": "row",
        "gap": "8px"
      },
      "countrySelector": {
        "wrapper": {
          "flexDirection": "column"
        },
        "element": {
          "border": "1px solid #D3D3D3",
          "borderRadius": "8px",
        }
      },
      "postalCodeInput": {
        "wrapper": {
          "flexDirection": "column"
        },
        "element": {
          "padding": "8px",
        }
      }
    },
  }
}
Performance optimizations
- Preloading all card form assets before users reach the payment page is possible. This could improve the end-user experience, as secure fields will appear on the page instantly.
- The browser will de-prioritize these assets and not slow down the page load, which will not hurt the user experience.
- You can check how preload works on MDN
import { Payrails } from "@payrails/web-sdk";

// function will put a <link rel="preload">'s to <head> with required assets for credit card form
Payrails.preloadCardForm();
Return Info
You can pass custom return URLs to SDK configuration. This controls the redirect behavior after authorization. This is specifically useful for payment methods needing full-page redirection or 3DS processes.
| Property | Type | Description |
|---|---|---|
cancel | string | URL to redirect to if the customer canceled the flow. |
success | string | URL to redirect to after a successful flow. |
error | string | URL to redirect to after a failed flow. |
Content security policy
If you have deployed a content security policy, please contact your account manager for the list of directives required by our SDKs.
Reporting a Vulnerability
If you discover a potential security issue in this project, please get in touch with us at [email protected].
Updated 4 months ago