Tokenize cards with Client-side Encryption
Tokenization refers to the process of collecting sensitive payment information and returning a short-term, single-use token that represents this information. Client-side Encryption is used for card data details to be sent directly to Payrails in an encrypted form to tokenize a Payment Instrument. If you need to know more about tokenization and Payrails Token Vault, we recommend you to first read this guide to tokenize cards.
Card details are encrypted on the client side with a public key given by Payrails. The encrypted data is then sent to Payrails and is then tokenized and returned to the client as a Payment Instrument.
Client Side Encryption assumes that the Card Holder Data is exposed to the client side HTML DOM before being encrypted and therefore accessible to javascript code, marketing tags and browser plugins. If you want to isolate the Card Holder Data from the rest of the page, you can either build your own isolated iframe for the collection form or adopt our Secure Fields.
Payrails Client-side Encryption uses RSA PKCS8. RSA PKCS8 is a widely used encryption algorithm used to securely transmit data between two parties. For each encryption, a one-time usage key pair is generated and valid for the next 10 minutes.
How it works
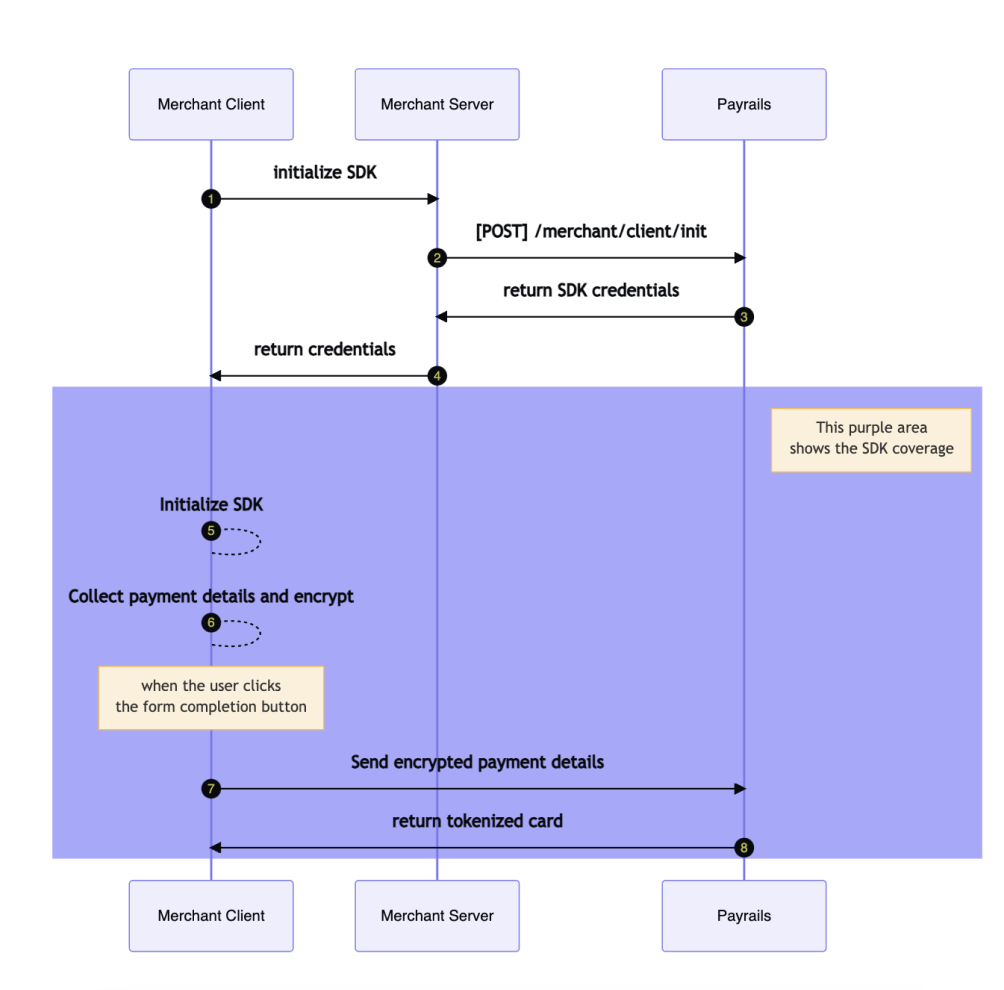
- You collect the payment details from your customer
- You encrypt the payment details with a public key given by Payrails
- You send the encrypted data to the tokenization endpoint of Payrails
- Payrails returns a tokenized Payment Instrument
To make sure your frontend can communicate securely with Payrails, you must first fetch configurations from your server side application. See detailed endpoint reference here with type
tokenization.
There are two ways to encrypt the card from your client (see detailed sections below):
- With Payrails CSE SDK: include the
payrails/web-cseto your page and benefit from our utilities to tokenize and eventually save the card. - With your own client-side implementation: Use the public key provided by the Payrails configurations to encrypt the data.
With Payrails CSE SDK
Here's a tokenization flow with the surface covered by the SDK colored in purple:
Web CSE SDK
The Client Side Encryption is available for the Web. The SDK is available as a npm package. After the SDK is initialized, you can leverage the SDK features to customize the user experience. The interfaces related to client-side encryption are InitResponse, Card and PayrailsCSE.
How to use the SDK:
- Install the npm package
npm install @payrails/web-cse- Use the SDK to encrypt the card details and tokenize the card
import { PayrailsCSE } from '@payrails/web-cse';
// Call the backend to get the init response
const initResponse = giveMeInitResponseFromBackend();
// Initialize CSE client
const cse = PayrailsCSE.init(initResponse);

// Get the card details from the form and prepare the object
const card = {
  holderName: 'test', // Optional
  cardNumber: '4111111111111111',
  expiryMonth: '12',
  expiryYear: '2022',
  securityCode: '123' // Optional
};

const options = {
  futureUsage: 'CardOnFile' // Optional, values 'CardOnFile' | 'Recurring' | 'UnscheduledCardOnFile';
  storeInstrument: false; // Optional, default false
}

// Tokenize the card
const tokenizedCard = await cse.tokenize(card, options);
console.log(tokenizedCard);
/**
 * {
 * "id": "8ff48a7b-3f3c-45a9-8fc5-175379d07e49",
 * ...
 * "data": {
 *   "bin": "41111",
 *   "holderName": "test",
 *   "network": "visa",
 *   "suffix": "1111"
 * },
 * }
*/- Optionally, you can encrypt the card for using it in another use case, like the Vault Proxy feature.
import { PayrailsCSE } from '@payrails/web-cse';
// Call the backend to get the init response
const initResponse = giveMeInitResponseFromBackend();
// Initialize CSE client
const cse = PayrailsCSE.init(initResponse);

// Get the card details from the form and prepare the object
const params: EncryptCardDataParams = {
  card : {
    holderName: 'test',
    cardNumber: '4111111111111111',
    expiryMonth: '03',
    expiryYear: '30',
    securityCode: '737'
  },
  data: {
    holderReference: 'test'
  }
}

// Encrypt the card
const encryptedCard = await cse.encryptCardData(params);
console.log(encryptedCard);
/**
 * fMA0GCSqGS......Ib3DQEBAQUAA4GNADCBiQKBgQChCW
*/For the use case of encrypting only the security code of the card, you can also use the
encryptCardDatafunction like this:const params: EncryptCardDataParams = { card : { securityCode: '737' } }
Android CSE SDK
The Client Side Encryption is available for Android. The SDK is available as an Android library on Maven Central.
How to use the SDK:
- Make sure you use Maven Central as a repository and add the library as a dependency (replace
X.Y.Zwith the latest version from Maven Central):
implementation 'com.payrails.android:cse:X.Y.Z'- Use the SDK to encrypt the card details or tokenize the card
import com.payrails.cse.Card
import com.payrails.cse.InitResponse
import com.payrails.cse.PayrailsCSE

// on IO thread (Dispatchers.IO) ...

try {
    // Call the backend to get the init response
    val initResponse = giveMeInitResponseFromBackend()

    // Initialize CSE client
    val cse = PayrailsCSE.init(initResponse)

    // Get the card details from the form and prepare the object
    val card = Card(
        holderName = "test",
        cardNumber = "4111111111111111",
        expiryMonth = "12",
        expiryYear = "2022",
        securityCode = "123",
    )

    // Tokenize the card
    val tokenizeResponse = cse.tokenize(card, storeInstrument = true)
    if (tokenizeResponse.code == 201) {
        println(tokenizeResponse.instrument)
        /**
         * {
         *   "id": "8ff48a7b-3f3c-45a9-8fc5-175379d07e49",
         *   ...
         *   "data": {
         *     "bin": "41111",
         *     "holderName": "test",
         *     "network": "visa",
         *     "suffix": "1111"
         *   },
         * }
         */
    } else {
        tokenizeResponse.errors.forEach {
            println(it)
            /**
             * {
             *   "id": "cdae0444-5b3b-4261-9c1e-05118a885991",
             *   "title": "request.malformed",
             *   "detail": "Card number is invalid"
             * }
             */
        }
    }

} catch (e: Exception) {
    // handle exception here
}
• Optionally, you can encrypt the card for using it in another use case, like the Vault Proxy feature.
- This feature is available as of version
v1.4.0
import com.payrails.cse.Card
import com.payrails.cse.InitResponse
import com.payrails.cse.PayrailsCSE

// on IO thread (Dispatchers.IO) ...

try {
    // Call the backend to get the init response
    val initResponse = giveMeInitResponseFromBackend()

    // Initialize CSE client
    val cse = PayrailsCSE.init(initResponse)

    // Get the card details from the form and prepare the object
    val card = Card(
        holderName = "test",
        cardNumber = "4111111111111111",
        expiryMonth = "12",
        expiryYear = "2024",
        securityCode = "123",
    )

    // Encrypt card holder data
    val encryptedCardData = cse.encryptCardData(card = card)
    println(encryptedCardData)

} catch (e: Exception) {
    // handle exception here
}The SDK does an API call and should therefore be called from within the IO thread with
Dispatchers.IO
For the use case of encrypting only the security code of the card, you can also use the
encryptCardDatafunction like this:val card = Card( securityCode = "123", ) // Encrypt card holder data val encryptedCardData = cse.encryptCardData(card = card) println(encryptedCardData)
iOS CSE SDK
The Client Side Encryption is available for Android. The SDK is available on Github
How to use the SDK:
- You can install the SDK by adding the following line to your
Podfile
pod 'PayrailsCSE'- Use the SDK to encrypt the card details or tokenize the card
import PayrailsCSE

func tokenizeWithPayrails() async {
  do {
    let response = try await giveMeInitResponseFromBackend()
    let payrailsCSE = PayrailsCSE.init(data: response.data, version: response.version)
    try payrailsCSE.tokenize(
      cardNumber: "4111111111111111",
      expiryMonth: "12",
      expiryYear: "24",
      completion: {(result: Result<TokenizeResponse, Error>) in
        switch result {
          case .success(let response):
            debugPrint("tokenization request successful")
            debugPrint(response)
          case .failure(let error):
            debugPrint("tokenization request failed")
            debugPrint(response)
        }
      })
  } catch {
    // handle expcetions here
  }
}- Optionally, you can encrypt the card to use it in another use case, like the Proxy payment instruments feature. This feature is available as of version
v0.2.0.
import PayrailsCSE

func encryptWithPayrails() async {
  do {
    let response = try await giveMeInitResponseFromBackend()
    let payrailsCSE = PayrailsCSE.init(data: response.data, version: response.version)
    let card = Card(
      holderReference: "mobile-sdk-test",
      cardNumber: "4111111111111111",
      expiryMonth: "12",
      expiryYear: "25",
      holderName: "test",
      securityCode: "123"
    )
    let encryptedCardData = try payrailsCSE.encryptCardData(card: card)
    debugPrint(encryptedCardData)
  } catch {
    // handle expcetions here
  }
}For the use case of encrypting only the security code of the card, you can also use the
encryptCardDatafunction like this:let card = Card(securityCode: "123") let encryptedCardData = try payrailsCSE.encryptCardData(card: card) debugPrint(encryptedCardData)
With your own client-side implementation
You can implement encryption in 4 steps:
Step 1. Fetch Payrails configuration from your server-side
From your server-side application, with a valid authentication token, fetch the tokenization configuration from Payrails via the client init endpoint with the type tokenization and get the response:
e.g.
{
  "version": "1.0.0-tokenization",
  "data": "eyJ0b2tlbiI6ImV5SmhiR2MuLi4iLCJob2xkZXJSZWZlcmVuY2UiOiJ1bmlxdWUtY3VzdG9tZXItcmVmZXJlbmNlIiwidG9rZW5pemF0aW9uIjp7ImlkIjoiNDdmMzJmYTktZjg3MS00MDNiLWI2MzQtNGViOWQzMWNlYmU2IiwicHVibGljS2V5IjoiTUlJQklqQU5CZ2txaGsuLi4iLCJsaW5rcyI6eyJ0b2tlbml6ZSI6eyJtZXRob2QiOiJQT1NUIiwiaHJlZiI6Imh0dHBzOi8vc2FuZGJveC1hcGktcHViLnN0YWdpbmcucGF5cmFpbHMuaW8vcHVibGljL3BheW1lbnQvaW5zdHJ1bWVudHMvdG9rZW5pemUifX19fQ=="
}
The data field can be decoded from base64 into a JSON object like this:
{
  "token": "eyJhbGc...",
  "holderReference": "unique-customer-reference",
  "tokenization": {
    "id": "47f32fa9-f871-403b-b634-4eb9d31cebe6",
    "publicKey": "MIIBIjANBgkqhk...",
    "links": {
      "tokenize": {
        "method": "POST",
        "href": "https://sandbox-api-pub.staging.payrails.io/public/payment/instruments/tokenize"
      }
    }
  }
}
Get the tokenization details from the decoded data:
token: the authentication token to use from the client when calling the tokenization endpoint- The authentication token is only valid for the given tokenization ID and holder reference. Make sure you send the same values when calling the Tokenize an instrument endpoint.
tokenization.id: the tokenization ID to use from the client when calling the tokenization endpointtokenization.publicKey: the public key to encrypt the payment details on the client-sidetokenization.links.tokenize.href: the URL of the tokenization endpoint from the client to tokenize the payment details
Step 2. Collect the payment details from your customer payment form
Collect and arrange all the relevant payment details needed from the form.
Step 3. Encrypt the card data
Encrypt the payment details (holder name, card number, expiry month, expiry year, and security code (optional)) with the public key given by Payrails:
- The public key is a PKCS8 RSA public key in the
PEMformat without header and line breaks - The encrypted data should be encoded as a base64 string
- See for example
SubtleCrypto.encrypt()
Step 4. Save the card in Payrails
Call the Tokenize an instrument endpoint with the encrypted payment details.
{
  "id": "bd86c284-44d0-41ad-9f52-3ab1b46f062e",
  "holderReference": "customer123",
  "encryptedInstrumentDetails": "eyJhbGciOiJSU0EtT0F...",
  "futureUsage": "CardOnFile"
}
Updated 28 days ago