PayPal
1. Overview
This document outlines the process for integrating PayPal Checkout via Payrails, supporting both One-Time Payments and Card Linking (Merchant-Initiated Transaction – MIT) setup flows.
Through this integration, you can initiate and manage PayPal payments using Payrails APIs, enabling customers to:
- Make a one-time payment using PayPal (redirect + capture flow), or
- Link their PayPal account during the first transaction for future MIT payments (card-on-file experience/subscription).
The flow can be implemented in two ways depending on your client-side capability:
- With PayPal Button SDK – Recommended when the app cannot reliably track user return from PayPal redirect URLs.
- The PayPal SDK handles the user approval journey and you trigger the Payrails Confirm API after
onApproveevent on the SDK.
- The PayPal SDK handles the user approval journey and you trigger the Payrails Confirm API after
- Without PayPal SDK (Redirect-Based Flow) – Suitable when the app can detect return via deep link or redirect.
- The customer is redirected to PayPal for approval, and once they return to your app, the Payrails Confirm API is triggered directly using the same token or order ID.
Both implementations use the same Payrails Create Execution → Authorize → Get Execution → Confirm pattern, with slight variations in how user approval is captured (via SDK or redirect).
2. Prerequisites
Before beginning the integration, ensure that the following PayPal and Payrails credentials and configurations are in place.
2.1 PayPal Credentials
You must obtain the following from PayPal:
| Credential | Description |
|---|---|
| Merchant ID | PayPal merchant account identifier |
| Main BN Code | Identifier used to attribute and track payments from the specific integration flow |
| Return URL | The endpoint to which PayPal redirects the customer after approval |
Magic Link Onboarding Process
In addition to manually obtaining credentials, Payrails supports a Magic Link process to streamline onboarding and credential sharing between yourself and PayPal.
The flow works as follows:
-
Magic Link Generation (by Payrails)
Payrails generates a unique magic link for each merchant. This link initiates the onboarding process directly with PayPal.
-
Merchant Login to PayPal Business Portal
Your representative logs in to the PayPal Business Portal using the credentials of the PayPal business account that will be used for processing payments.
-
Authorization of Payrails
Once logged in, you authorize Payrails to process PayPal payments on its behalf. This authorization securely links your PayPal merchant account with the Payrails platform.
-
Automatic Retrieval of PayPal Credentials
After successful authorization, Payrails automatically fetches key configuration details such as:
- Merchant ID
- BN Code
- Other required metadata (as applicable)
These values are then automatically populated into the Payrails Merchant Portal under the PayPal provider configuration.
The magic link onboarding process must be completed separately for both staging and production environments to ensure proper credential isolation and validation.
2.2 Payrails Setup
Ensure that PayPal is configured as a provider in the Payrails dashboard with valid credentials and active status.
Refer to:
3. Implementation Steps
The integration consists of two main flows:
- First-Time Payment (Card Linking) / OneTime – to authorize and link a PayPal account or One Time Payment.
- Subsequent Payments (MIT) – to charge using the stored PayPal instrument.
3.1 First-Time Payment (Card Linking Flow) / One Time Payment
Step 1 – Create Execution API
Initiate a payment flow by calling the Create Execution API.
The response returns an executionId.
Step 2 – Create Authorization API
Use the execution ID from Step 1 to call the Authorize Action API.
Sample request body (Card Linking):
{
  "amount": {
    "currency": "USD",
    "value": "100.00"
  },
  "meta": {
    "customer": {
      "country": { "code": "US" }
    },
    "order": {
      "lines": [
        {
          "id": "3c42ad51-37d0-5bf9-af08-dabd0aade085",
          "name": "payrails_monthly",
          "quantity": 1,
          "unitPrice": {
            "currency": "USD",
            "value": "100.00"
          }
        }
      ]
    }
  },
  "paymentComposition": [
    {
      "amount": { "currency": "USD", "value": "100.00" },
      "enrollInstrumentToNetworkOffers": false,
      "integrationType": "api",
      "paymentMethodCode": "payPal",
      "storeInstrument": true
  ],
  "returnInfo": {
    "cancel": "**",
    "error": "**",
    "pending": "**",
    "success": "**"
  },
  "workflowCode": "payment-acceptance"
}
Sample request body (One Time):
{
      "amount": {
        "currency": "USD",
        "value": "100.00"
      },
      "meta": {
        "customer": {
          "country": {
            "code": "US"
          }
        },
        "order": {
          "lines": [
            {
              "id": "**",
              "name": "payrails_monthly",
              "quantity": 1,
              "unitPrice": {
                "currency": "USD",
                "value": "100.00"
              }
            }
          ]
        }
      },
      "paymentComposition": [
        {
          "amount": {
            "currency": "USD",
            "value": "100.00"
          },
          "integrationType": "api",
          "paymentMethodCode": "payPal"
        }
      ],
      "returnInfo": {
        "cancel": "**",
        "error": "**",
        "pending": "**",
        "success": "**"
      },
      "workflowCode": "payment-acceptance"
    }
A valid response indicates that the authorization process has been initiated.
Step 3 – Poll Execution Status
Poll the Get Execution by ID API using the same executionId until you receive a response with actionRequired: "confirm".
Examples:
Billing Agreement (Store Instrument = true):
"actionRequired": "confirm",
"requiredAction": {
  "method": "POST",
  "type": "confirm",
  "subType": "client",
  "action": {
    "redirectUrl": "https://www.sandbox.paypal.com/agreements/approve?ba_token=BA-**",
    "parameters": {
      "tokenId": "BA-**"
    }
  }
}
One-Time Order (Store Instrument = false):
"actionRequired": "confirm",
"requiredAction": {
  "method": "POST",
  "type": "confirm",
  "subType": "client",
  "action": {
    "redirectUrl": "https://www.sandbox.paypal.com/checkoutnow?token=*787*",
    "redirectMethod": "GET",
    "parameters": {
      "orderId": "*787*"
    }
  }
}
Once actionRequired: "confirm" is received, you must either use the PayPal Button SDK or directly redirect the customer and confirm after return.
3.1.1 Option A — Using PayPal Button SDK (Recommended)
If you cannot reliably detect when the user returns from the PayPal redirect URL, the PayPal Button SDK must be used.
SDK Setup
Load the PayPal SDK using the Client ID (provided by Payrail) and Merchant ID (provided by PayPal) during provider configuration.
Refer to PayPal’s official documentation for SDK parameters and usage examples:
A) Billing Agreement / Subscription Flow (Store Instrument = true)
Use the tokenId from the Payrails response as the plan_id in createSubscription.
const tokenIdFromPayrails = "BA-**";

paypal.Buttons({
  displayOnly: ["vaultable"],
  createBillingAgreement: async () => {
        const paymentComposition = [
          {
            paymentMethodCode: 'PAYPAL',
            integrationType: 'api',
						"amount": { "value": "100.00", "currency": "EUR" },
            storeInstrument: true,
          },
        ];

        const authorizationResult =
          await authorize(paymentComposition)

        const confirmLink = getConfirmLink(authorizationResult);
				const tokenId = getTokenIdFromResponse(authorizationResult);
        return tokenId;
  },
  onApprove() {
    confirmPayrailsPayment({ tokenId: tokenIdFromPayrails });
  },

  onCancel() { /* optional UX */ },
  onError()  { /* optional UX */ }

}).render("#paypal-button-container");

function confirmPayrailsPayment(payload) {
  // POST to your backend → Payrails Confirm API (Step 4)
  // Body: { "data": payload }
}
B) One-Time Order Flow (Store Instrument = false)
Use the orderId returned by Payrails in the createOrder call.
paypal.Buttons({
  async createOrder() {
	  const paymentComposition = [
          {
            paymentMethodCode: 'PAYPAL',
            integrationType: 'api',
"amount": { "value": "100.00", "currency": "EUR" },
            storeInstrument: false,
          },
        ];
     const authorizationResult =
          await authorize(paymentComposition)

        const confirmLink = getConfirmLink(authorizationResult);
				const tokenId = getTokenIdFromResponse(authorizationResult);
        return orderId;

  },

  async onApprove() {
    confirmPayrailsPayment({ orderId: orderIdFromPayrails });
  },

  onCancel() { /* optional UX */ },
  onError()  { /* optional UX */ }

}).render("#paypal-button-container");

function confirmPayrailsPayment(payload) {
  // POST to your backend → Payrails Confirm API (Step 4)
  // Body: { "data": payload }
}
Important:
When the PayPal SDK’s onApprove event is triggered, you must immediately call the Payrails Confirm API (Step 4) to finalize the transaction.
3.1.2 Option B — Without SDK (If Redirect Detection Is Reliable)
If you can detect when the customer returns from PayPal (e.g., via deep link or web callback), the SDK can be skipped.
- Poll until
actionRequired: "confirm". - Extract
redirectUrland eithertokenIdororderId. - Redirect the customer to the
redirectUrl. - Detect their return to the application.
- Call Confirm API (Step 4) directly.
4. Confirm API
When the PayPal SDK’s onApprove event fires (or when you detect return from the redirect URL), call the Payrails Confirm API to finalize the payment.
The payload depends on the flow type:
A) Billing Agreement / Subscription (storeInstrument = true)
Use the tokenId returned from the Get Execution API:
{
  "data": {
    "tokenId": "BA-**"
  }
}
B) One-Time Order (storeInstrument = false)
Use the orderId returned from the Get Execution API:
{
  "data": {
    "orderId": "*787*"
  }
}
Upon successful confirmation, Payrails will:
- Capture and complete the payment.
- Trigger a webhook notification (Step 5) to you containing the authorization result and any created
paymentInstrumentId(if applicable).
You should handle this webhook to confirm transaction success and persist any instrument details for MIT flows.
5. Handling Webhook Notifications
Payrails sends a webhook callback to you containing payment details and the stored instrument ID.
A sample webhook payload is shown below.
{
  "action": "authorize",
  "success": true,
  "amount": {
    "value": "100.00",
    "currency": "USD"
  },
  "execution": {
    "workflowCode": "payment-acceptance",
    "id": "********-****-****-****-************",
    "merchantReference": "order-********-****-****-****-************"
  },
  "paymentComposition": [
    {
      "integrationType": "api",
      "paymentMethodCode": "payPal",
      "paymentInstrumentId": "********-****-****-****-************",
      "providerReference": "******************",
      "amount": {
        "value": "100.00",
        "currency": "USD"
      },
      "operationType": "Authorize",
      "success": true,
      "operationResult": "Success",
      "paymentInstrument": {
        "id": "********-****-****-****-************",
        "displayName": "sb-****************@personal.example.com",
        "description": "PayPal",
        "data": {
          "email": "sb-****************@personal.example.com",
          "payerId": "************"
        }
      }
    }
  ]
}
You should persist the paymentInstrumentId from this webhook for subsequent payments.
6. Subsequent Payments (Merchant-Initiated Transactions)
For follow-up transactions using the same stored PayPal instrument, you must initiate a new Create Execution API call using the saved paymentInstrumentId.
Sample Request Body:
{
  "merchantReference": "{{$randomUUID}}",
  "holderReference": "***",
  "initialActions": [
    {
      "action": "authorize",
      "method": "POST",
      "body": {
        "amount": {
          "value": "100.00",
          "currency": "USD"
        },
        "returnInfo": {
          "success": "https://mysuccessurl.com"
        },
        "paymentComposition": [
          {
            "integrationType": "api",
            "amount": {
              "value": "100.00",
              "currency": "USD"
            },
            "paymentInstrumentId": "91cebb3a-2794-4d5d-bc6d-32d84aa99f0d",
            "paymentMethodCode": "payPal"
          }
        ]
      }
    }
  ]
}
This call directly authorizes and captures the payment using the previously stored PayPal instrument, without requiring customer re-authentication.
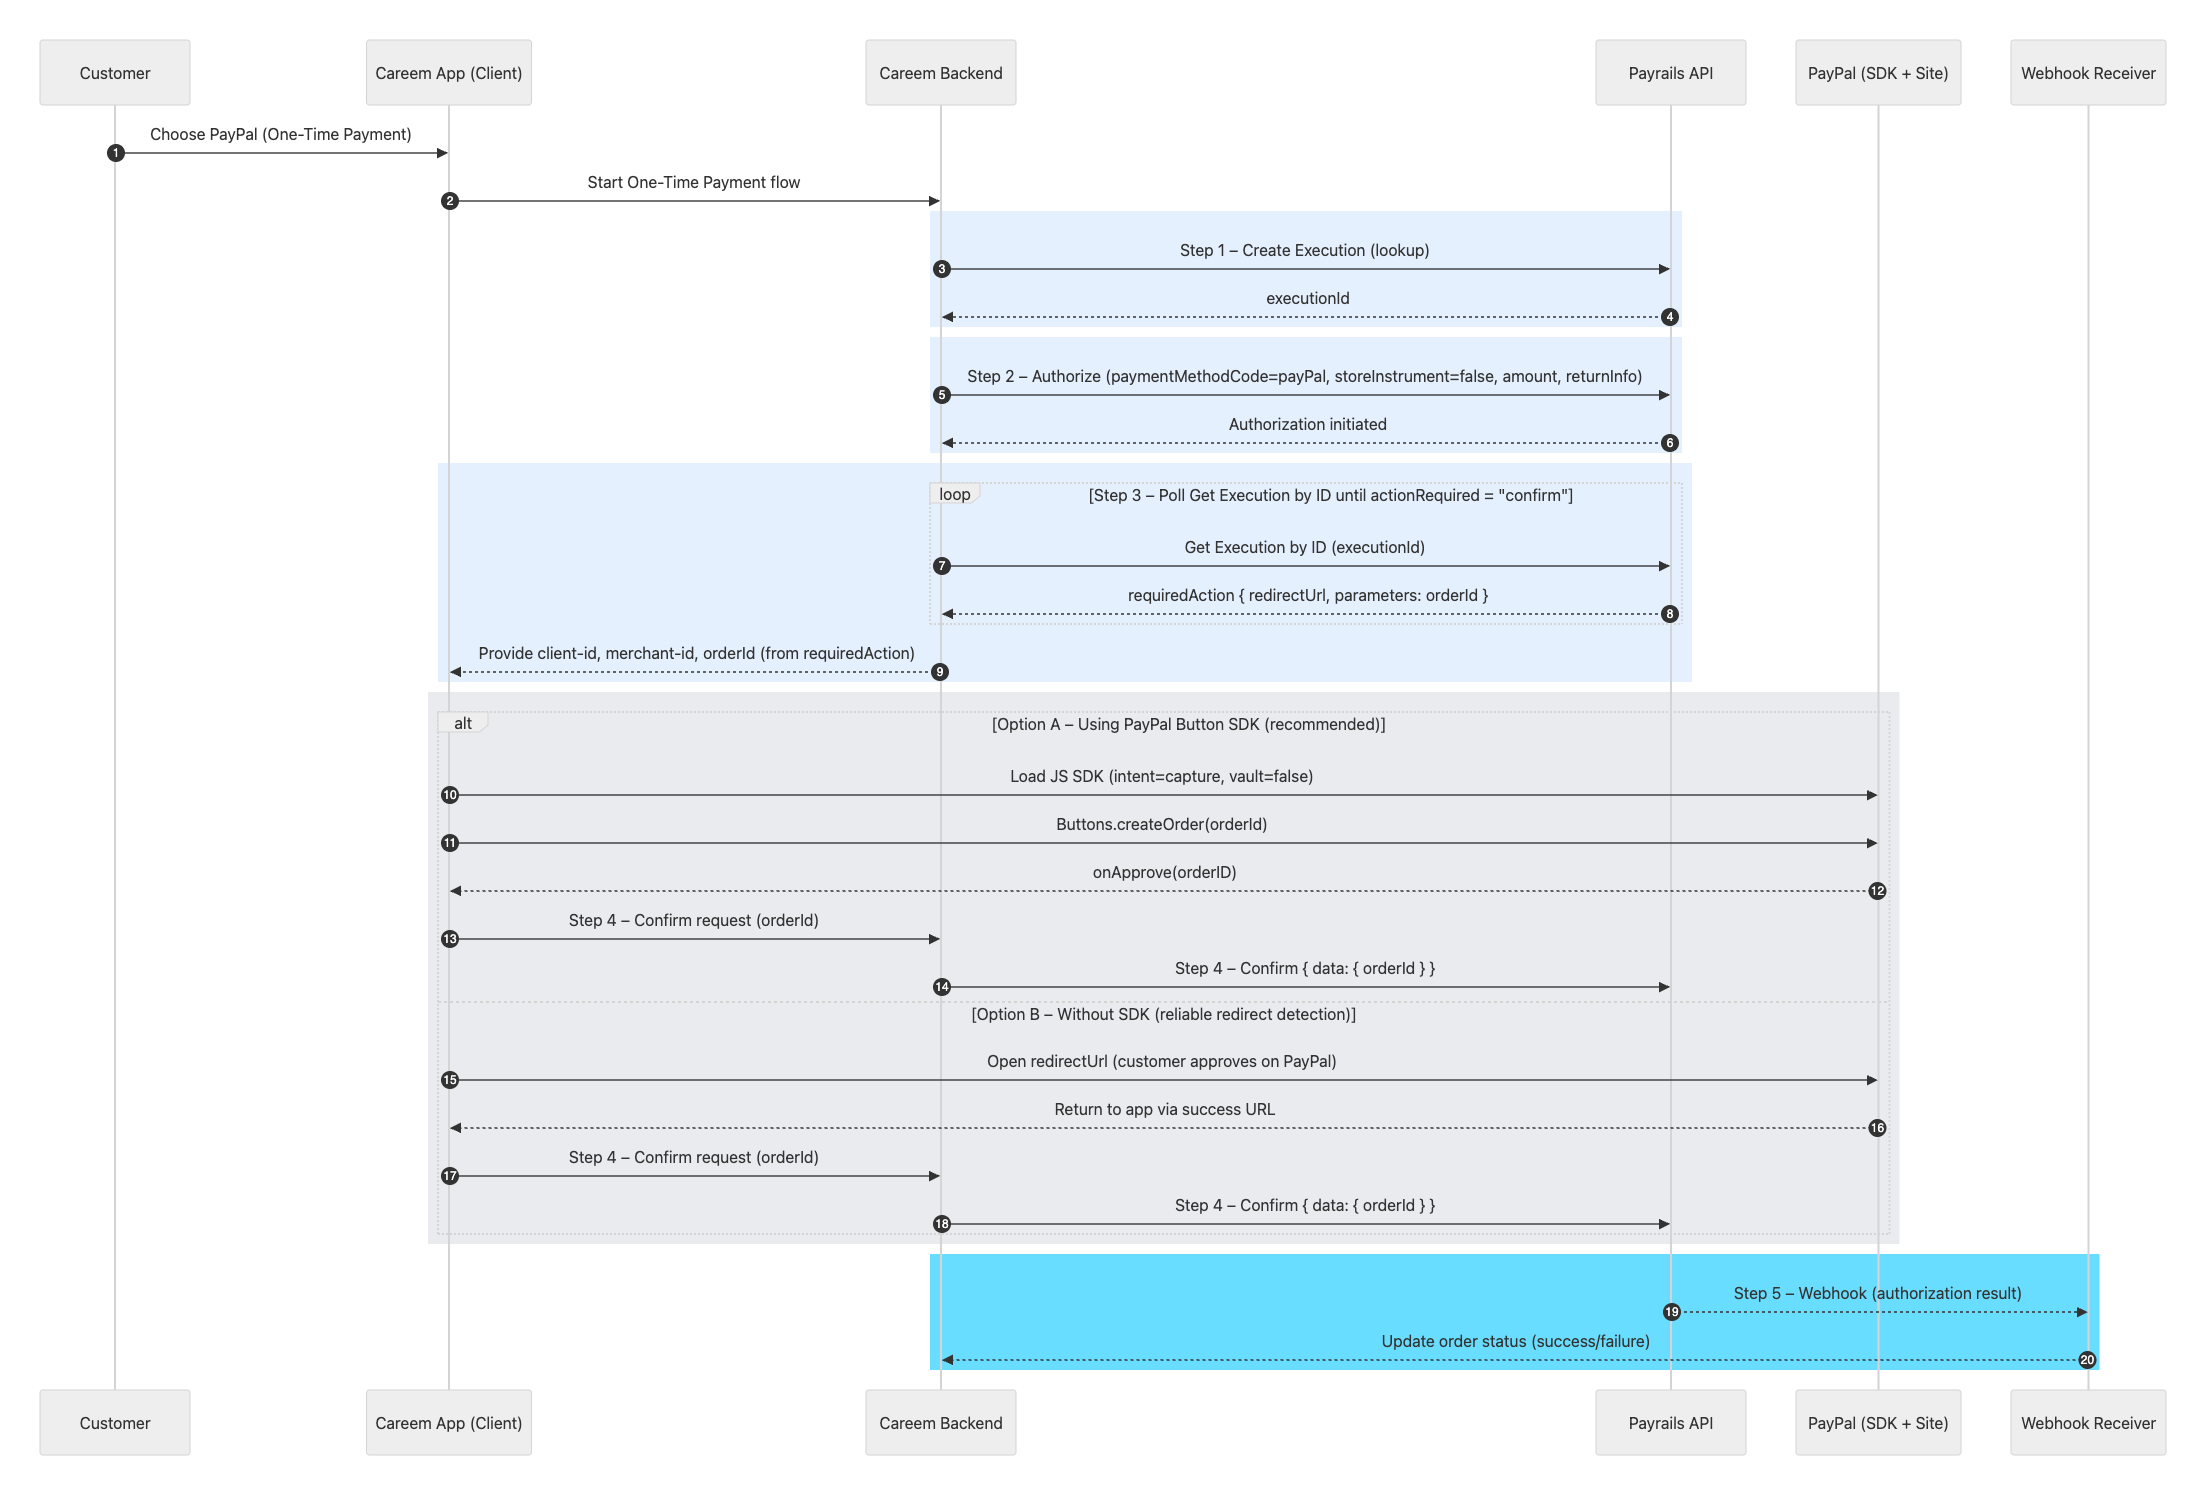
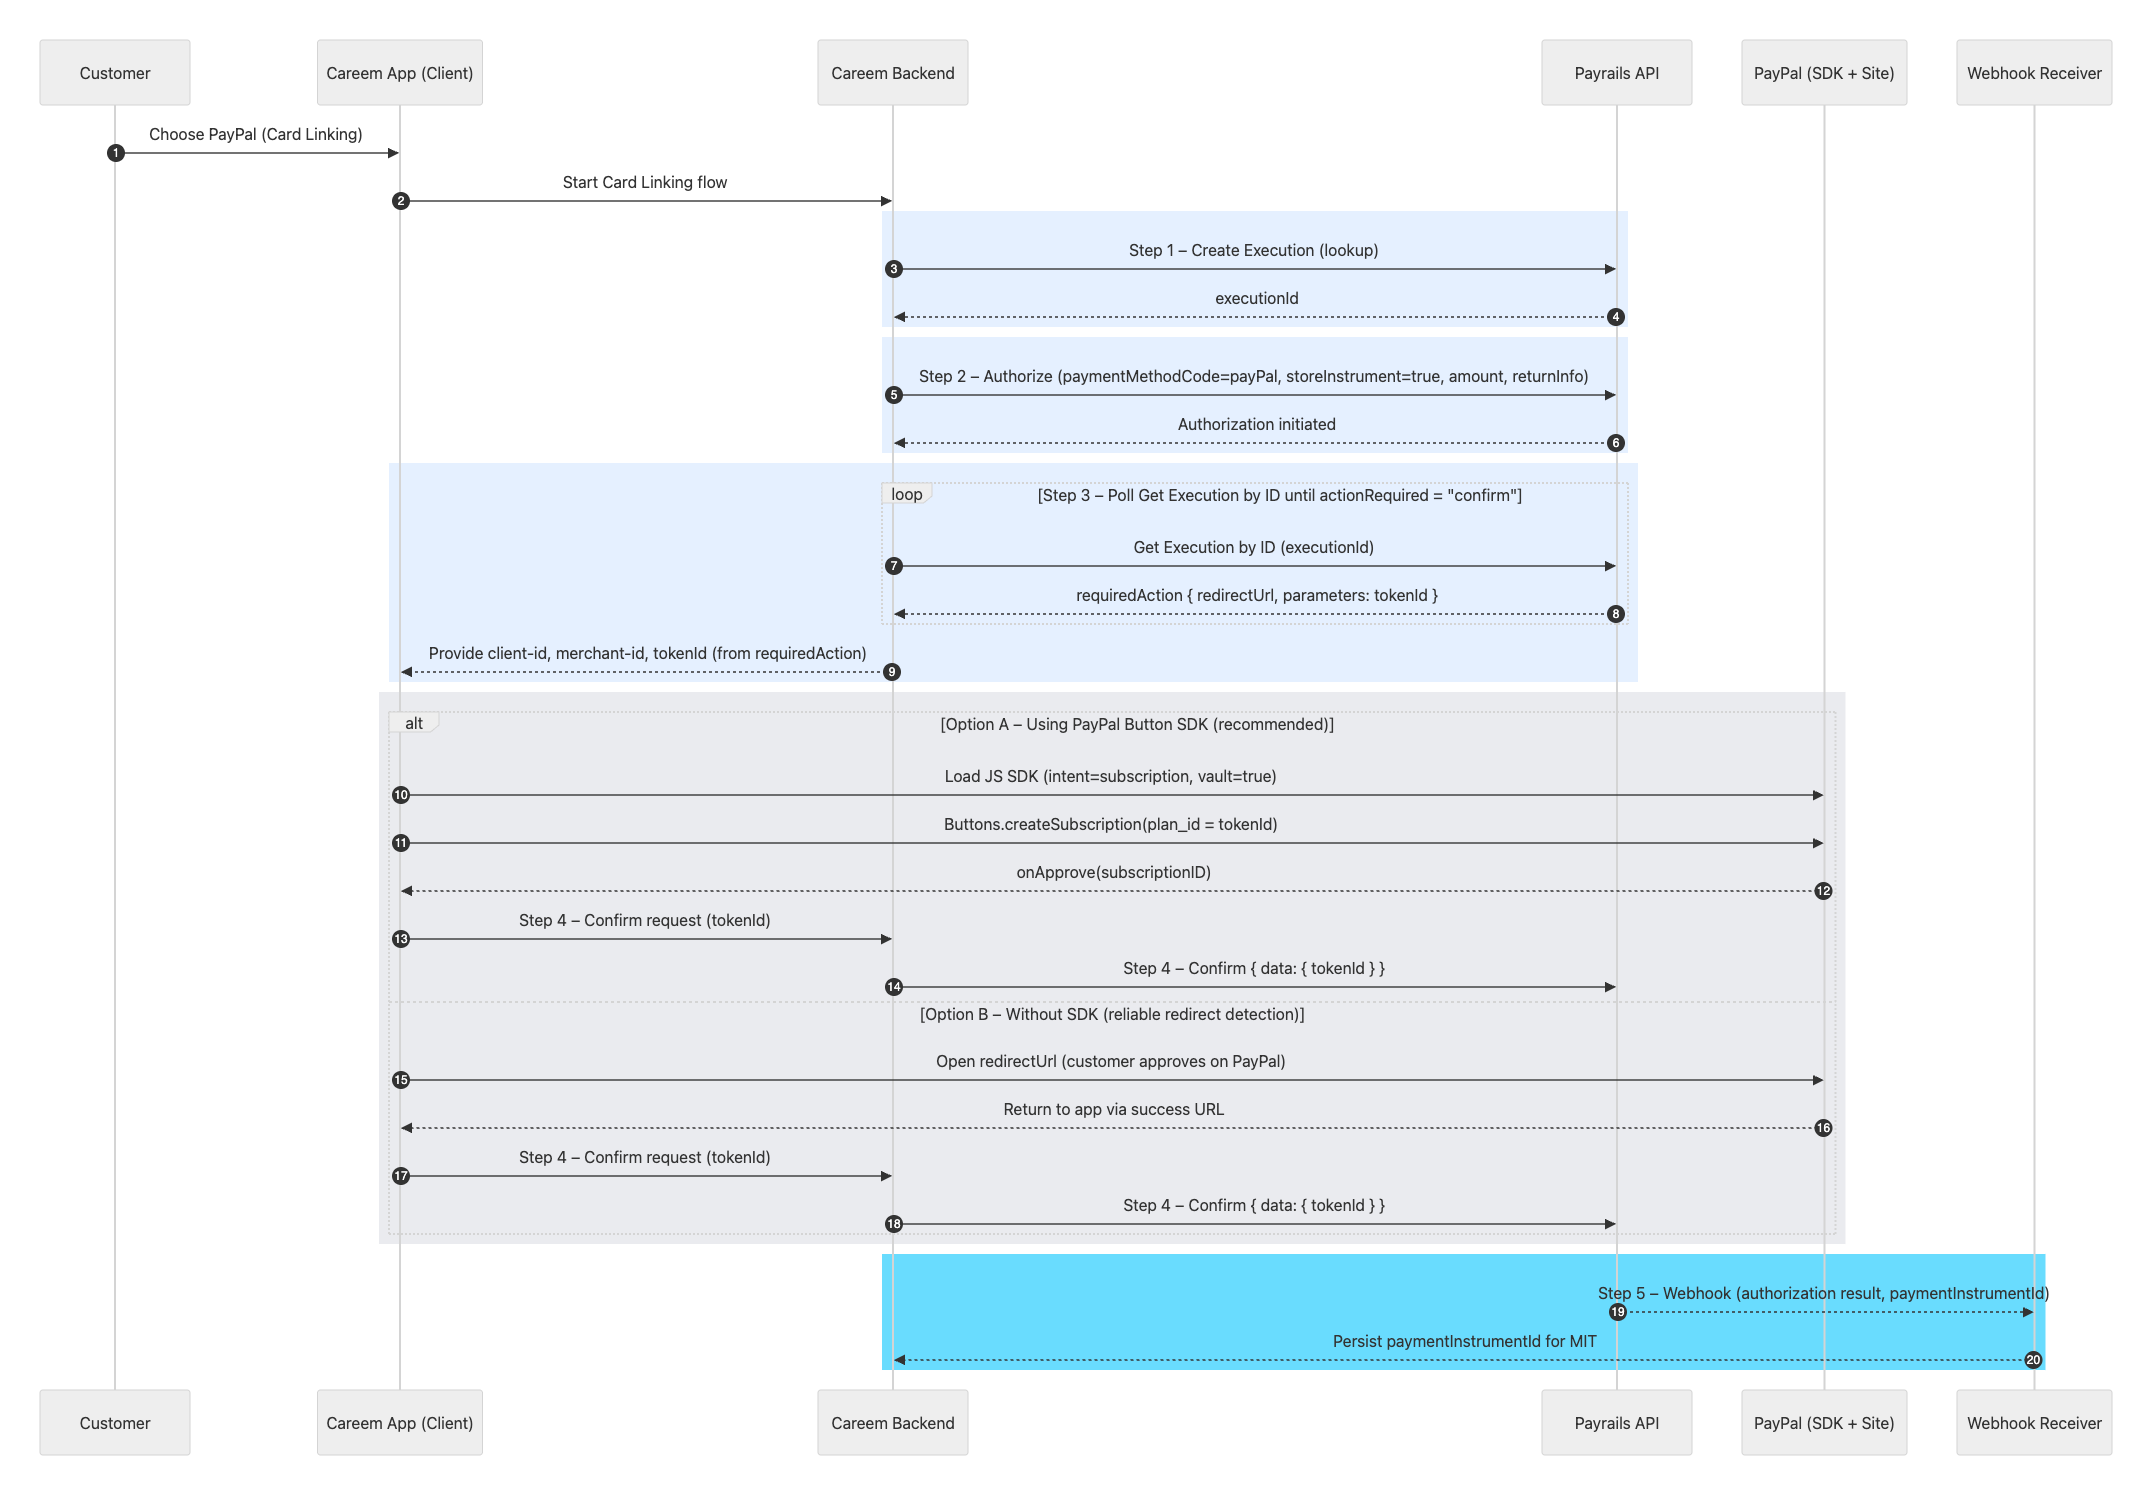
7. Sequence Diagram
Below is the sequence diagram representing the full PayPal Checkout flow via Payrails.
One-Time PayPal Checkout Flow
Subscription / Card Linking Flow (Store Instrument = true)
8. Recurring Transaction (MIT) Behavior
For recurring PayPal transactions (MIT), the PayPal billing agreement is backed by the customer’s funding card rather than their PayPal wallet balance.
In cases where the associated card has insufficient funds, the MIT payment attempt will fail with an “insufficient balance” error.
This is expected behavior from PayPal’s processing logic.
Updated 10 months ago