Amazon
A step-by-step guide for setting up your Amazon payments services integration in the Payrails portal.
Who should use this guideThis guide is intended for merchants who:
- Use Payrails as a payment orchestrator
- Use Amazon Payment Service (APS) for payments
- Are approved to process raw card data
_We use a server-to-server integration with Amazon, so your account must be enabled to process raw card data. If this isn’t enabled, payments won’t work in production. Please contact your Amazon account manager or support team to activate it.
Create and configure an Amazon Payment Service integration in Payrails
- Log in to the Payrails portal.
- Go to Settings → Integrations.
- Select Add instance to create a new integration configuration.
- Select the workspaces where this integration should be available.
About workspaces
Workspaces determine where this integration can be used. They allow you to isolate provider setups by region or business line, or share a single configuration across multiple environments.
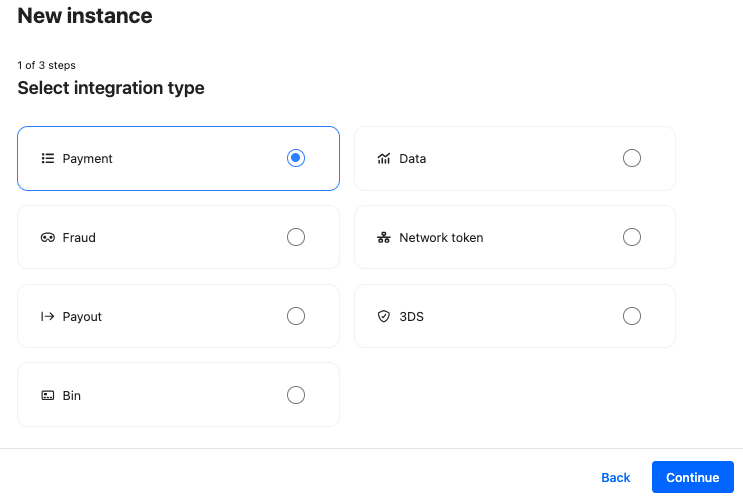
Step 1: Choose the integration type
- Select Payment and continue to the next step.
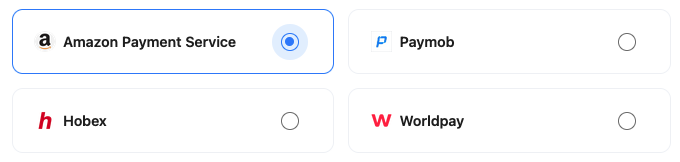
Step 2: Choose the provider
- Select Amazon Payment Service and continue to the next step.
Step 3: Configure your Amazon Payment Service integration
What you’ll need from Amazon Payment ServiceBefore you begin, make sure you have access to:
- APS Merchant identifier
- APS Access code
- APS SHA request phrase and SHA response phrase (SHA256)
Sign in to your Amazon Payment Service dashboard to complete this step.
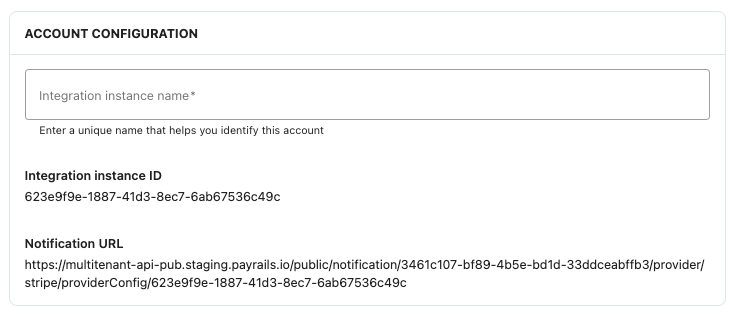
Integration instance name
An integration instance is a specific payment provider setup in Payrails. You can create multiple instances for each provider based on region, currency, or business needs. Choose a clear, consistent name, as it is used in routing.
In Payrails
- Enter a clear and descriptive Instance name.
Account details
In Amazon
- Sign in to the Amazon Payment Service (APS) merchant dashboard.
- Navigate to Merchant management → Integration settings → Security settings.
- Copy the Merchant identifier.
In Payrails
- Paste the Merchant identifier into the Merchant ID field.
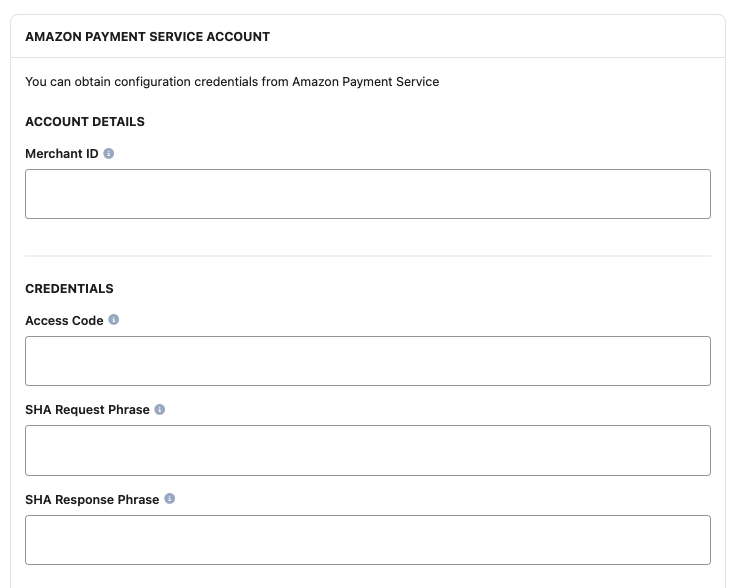
Credentials
Start by testing your integration using Amazon's sandbox credentials. When you finish testing, switch to production credentials and go live.
Make sure the credentials you enter in Payrails match the environment you are configuring (test or live).
In Amazon
- On Security settings, copy the Access code value.
In Payrails
- Paste the value into the Access code field.
In Amazon
- Select SHA256.
- Copy the SHA Request phrase and SHA Response phrase.
In Payrails
- Paste the values into the corresponding SHA Request phrase and SHA Response phrase fields.
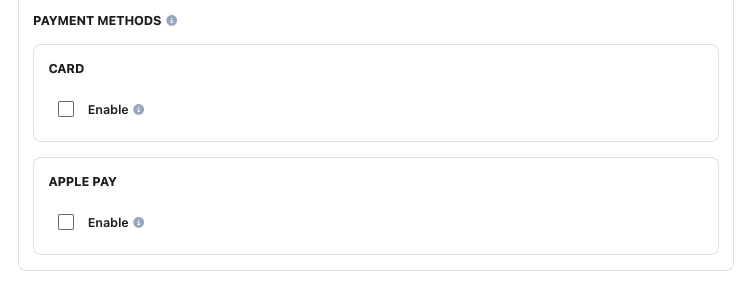
Payment methods
In Payrails
- Select the payment methods that should be enabled.
Webhook (Direct Transaction Feedback)
Payrails uses Amazon Payment Service Direct Transaction Feedback to receive asynchronous payment status updates.
Configure the feedback URL in the same environment (test or production) as your Payrails integration.
In Amazon
- Navigate to Merchant management → Integration settings → Technical settings.
- Select Trusted channel.
Alternatively, you may be asked to select your activated integration and choose Hosted Checkout, Custom Integration, or Mobile SDK.
In Payrails
- Copy the Notification URL.
In Amazon
- Paste the Payrails Notification URL into the Direct Transaction Feedback URL field.
- Choose Yes for the Downgrade CVV 3DS option.
- Select Save changes.
Enable the integration
In Payrails
- Select Save account to enable the integration.
The Enabled status confirms that the Amazon Payment Service integration is active and available for routing.
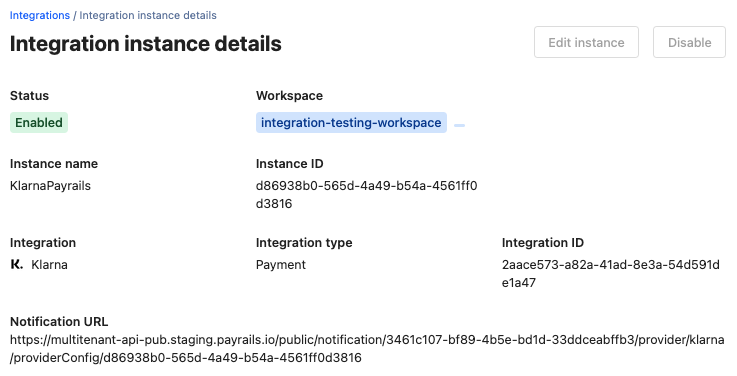
Your Amazon Payment Service integration is now ready to process payments in the selected environment.
Next steps
- Run a test payment using an Amazon Payment Service test card.
- Verify that:
- The payment appears in Amazon Payment Service.
- The payment status updates correctly in Payrails.
- Once verified in test mode, repeat the setup in live mode.
→ Continue to: Test a payment